Magical Bubble Painting Art for Kids: A Colorful DIY Adventure
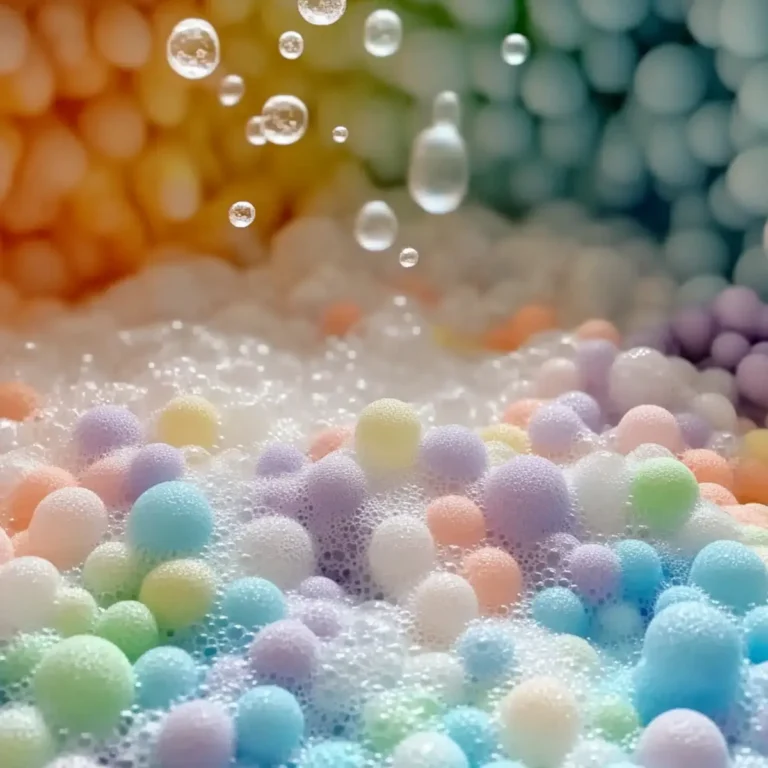
The joy of creating art can be as simple as blowing bubbles! I recently discovered this whimsical DIY Bubble Painting project while looking for new ways to engage my little ones in creativity. With just a few household ingredients, we dove into a world of vibrant colors and unforgettable fun. Watching the delight on their faces as colorful bubbles kissed the paper was nothing short of magical!
Imagine the excitement as your kids take turns blowing bubbles in a playful dance, each bubble leaving behind its unique imprint on heavyweight paper. Not only is bubble painting an easy-to-follow activity, but it’s also a fantastic way to unleash their imagination while developing fine motor skills. This sensory experience transcends traditional art, inviting creativity in the most delightful way.
So grab your aprons and let’s transform a simple afternoon into an artistic adventure filled with laughter and colorful memories. Whether it’s a rainy day or a joyous birthday event, this Bubble Painting Art for Kids is a creative escape waiting to happen!

Why is Bubble Painting Art for Kids Magical?
Vibrant Colors: Watch as your children create stunning designs using liquid watercolors or food coloring. Interactive Fun: Everyone gets involved in the excitement of blowing bubbles, making it a lively group activity. Creative Exploration: From unique patterns to imaginative colors, each piece becomes a one-of-a-kind masterpiece! Easy Cleanup: With just minimal ingredients, you’re set for a mess-free afternoon. Plus, encourage their artistic skills in a fun way with this DIY project that blends creativity and play. For more creative ideas, check out our other engaging [art projects for kids](internalLink)!
Bubble Painting Art for Kids Ingredients
• Gather these simple essentials for colorful creativity!
- Dish Soap or Tear-Free Baby Wash – Ensures bubbly fun; choose a gentle formula when working with younger children.
- Water – Acts as the base for your mixture; proper dilution creates delightful bubbles.
- Liquid Watercolors or Food Coloring – Infuses your bubbles with vibrant colors; feel free to experiment with various shades!
- Plastic Cups or Small Bowls – Perfect for mixing colors; use one for each hue to keep things organized.
- Straws – Aids in bubble creation; opt for reusable ones to be eco-friendly!
- Heavyweight Paper (Watercolor Paper or Cardstock) – Ideal for painting, as it absorbs the bubbles without curling.
- Optional: Aprons or Old T-shirts – Help protect clothing from splashes; a must-have for keeping cleanup minimal, especially with little ones around!
How to Make Bubble Painting Art for Kids
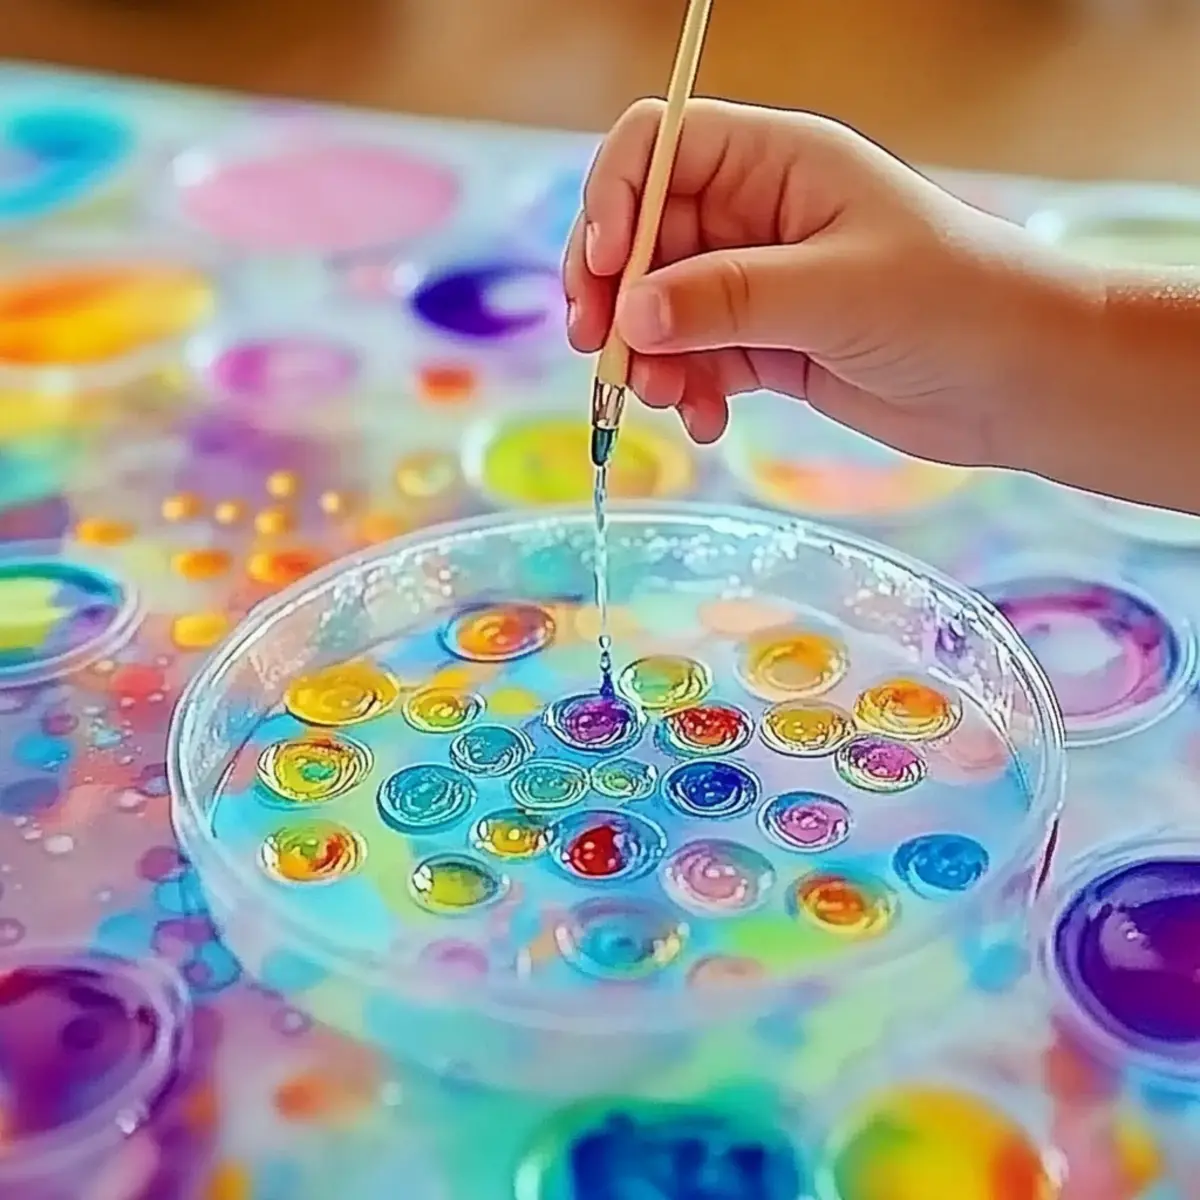
Mix Ingredients: In a plastic cup or bowl, combine 2-3 tablespoons of dish soap, 0.25 cup of water, and a few drops of liquid watercolor or food coloring for each color. Stir gently to blend.
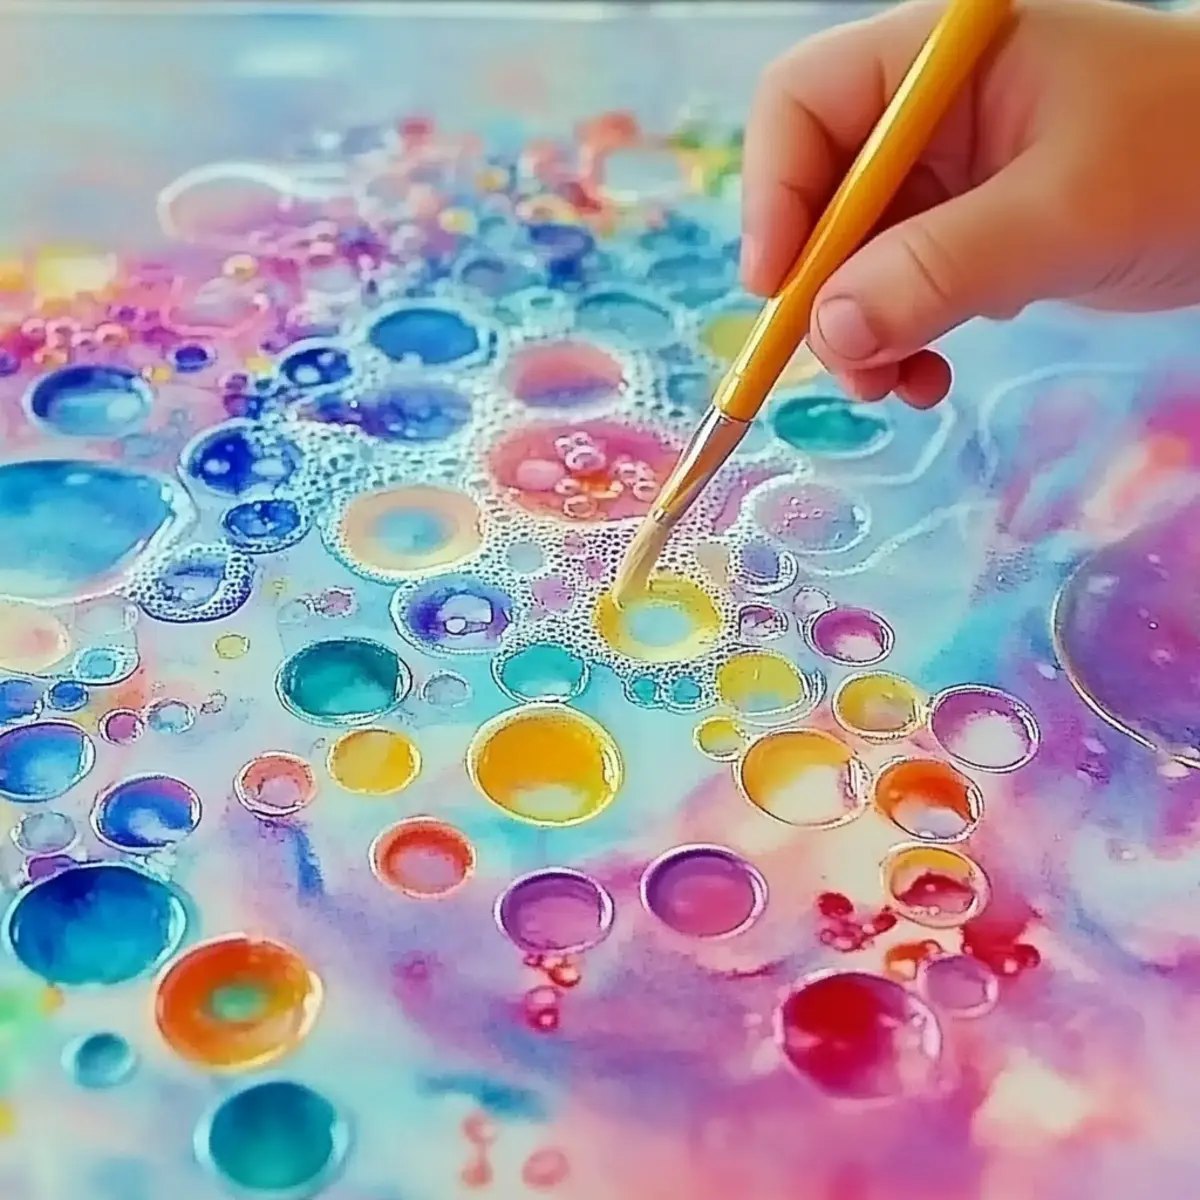
Create Bubbles: Using a straw, carefully blow into the mixture to create bubbles. Avoid sucking in the mixture to prevent any accidents. Aim for a bubbly layer just above the surface!
Imprint Art: Once you see bubbles forming, press a piece of heavyweight paper onto the bubbles. The bubbles will leave colorful imprints, creating beautiful art as you lift the paper.
Explore More Colors: Repeat the bubble creation and imprinting process with different colors, allowing each piece of art to dry fully before moving on to the next masterpiece.
Showcase Your Creations: Once the artwork has dried, proudly display your colorful bubble art or store it flat in a safe place to keep those imaginative works intact.
Optional: For extra sparkle, add fine glitter to your bubble mixture before making art!
Exact quantities are listed in the recipe card below.

Storage Tips for Bubble Painting Art
Display Artwork: Once your bubble paintings are dry, showcase them proudly on walls or in a dedicated art gallery corner. It’s a delightful way to celebrate creativity!
Flat Storage: If you want to store the bubble paintings, keep them flat in a dry place to maintain their integrity. Avoid stacking them to prevent smudging the colorful bubble imprints.
Timeframe: Keep stored artwork for up to several weeks in good condition if protected from moisture and sunlight. Proper storage will help preserve the beauty of your bubble painting art for kids.
Reinforcing Artwork: Consider adding a coat of clear sealant spray to protect the colors if you plan on keeping the artwork longer. This adds longevity and keeps those magical memories vibrant!
Expert Tips for Bubble Painting Art
- Supervision is Key: Always keep an eye on younger children to ensure their safety and that they don’t accidentally ingest the bubble mixture.
- Optimal Paper Choice: Use heavyweight paper or cardstock to prevent curling and allow for better absorption during the bubble painting process.
- Bubble Control: For best results, blow gently into the mixture to form a stable layer of bubbles; avoid over-blowing to prevent spills.
- Color Exploration: Encourage kids to experiment with mixing colors and creating their own bubble designs; it makes the Bubble Painting Art experience even more enjoyable!
- Cleanup Made Easy: Lay down a drop cloth or old newspapers for easy cleanup after your artistic session. Protect surfaces and have fun without the worry!
Bubble Painting Variations
Feel free to add your own spin to this delightful bubble painting project!
Color Swap: Use different types of liquid watercolors or food coloring for a unique palette each time.
Texture Boost: Add corn syrup to your bubble mixture for a thicker consistency, resulting in fuller, more durable bubbles.
Glittery Fun: Sprinkle in some biodegradable glitter for an enchanting touch that sparkles on your final art.
Scented Bubbles: Add a few drops of essential oils to the dish soap for a fragrant painting experience that invokes joy.
Large Scale Painting: Use a big piece of canvas instead of paper for larger masterpieces; great for outdoor activities!
Fruit-Infused Colors: Mix in fruit juice with natural gradients for a sweet-smelling twist that adds to the color mix.
Themed Colors: Choose colors based on holidays or seasons! Think pastels for spring or rich jewel tones for fall.
Encourage the little ones to explore their creativity, and remember, every bubble painting will be unique and full of personality!
What to Serve with Bubble Painting Art for Kids?
Transform a creative day into a delightful experience with tasty snacks and fun drinks that elevate the joy of your bubble painting adventure!
Fruit Skewers: Bright, colorful fruit on sticks add a refreshing burst of flavor, mirroring the vibrant hues of your artwork.
Mini Sandwiches: Easy to eat and perfect for little hands, these can be filled with peanut butter or ham, fueling creativity with every bite.
Yogurt Parfaits: Layered with granola and berries, these delicious treats provide a sweet finishing touch to your artistic session.
Vegetable Dippers: Crunchy carrots and bell peppers served with a light ranch dip promote healthy eating while kids explore their creativity.
Homemade Lemonade: A zesty, refreshing drink that complements the creative chaos; sweeten to taste for a delightful treat.
DIY Ice Cream Sundaes: Let kids build their own sundaes with toppings—it’s not just a snack, but an art project in itself! With every scoop, they can express their unique style.
Popcorn Mix: Create a magical blend with popcorn, chocolate candies, and nuts; it’s a fun, easy-to-make snack that keeps everyone munching while they paint.
These delightful pairings will not only satisfy their taste buds but also enhance the vibrant atmosphere of your bubble painting party!
Make Ahead Options
These DIY Bubble Painting activities are perfect for busy home cooks looking to simplify their crafting plans! You can prepare the bubble mixture (2-3 tablespoons of dish soap, 0.25 cup of water, and food coloring) up to 24 hours in advance; simply store it in a covered container in the refrigerator. This will keep the bubbles fresh and vibrant. When you’re ready to dive into the fun, just give the mixture a gentle stir before blowing bubbles to create colorful imprints on heavyweight paper. This not only saves time but ensures your little ones can jump right into the magical world of bubble painting art whenever creativity strikes!
DIY Bubble Painting for Kids Recipe FAQs
What type of dish soap or wash should I use?
Absolutely! For making bubble painting, I recommend using a gentle dish soap or a tear-free baby wash, especially if younger children are involved. This ensures that it’s safe on their skin and helps create a beautiful bubbly mixture.
How should I store the bubble painting artwork?
To store your bubble painting art, allow it to dry completely first. Once dry, keep the artwork flat in a dry place away from moisture and sunlight to avoid smudging. Properly stored, you can enjoy these masterpieces for several weeks!
Can I freeze any leftover bubble painting mixture?
While it’s not common to freeze bubble mixtures, if you happen to have extra, you can freeze it in ice cube trays for a fun twist on your next bubble painting session. Just remember to let it thaw before using it again for optimal bubble creation!
What if the bubbles don’t form well?
If you find that your bubbles aren’t forming correctly, try checking the proportions of your ingredients. Make sure you’re using enough dish soap (around 2-3 tablespoons per 0.25 cup of water) and that you’re blowing gently into the mixture with the straw. If necessary, you can also add a bit more soap to create a better bubble foundation.
Are there any allergy considerations for this activity?
Yes, definitely! It’s essential to check for any allergies related to the ingredients used. Ensure the dish soap or baby wash is hypoallergenic. If using food coloring, opt for natural options to avoid allergens. Always supervise younger children during the activity for safety.
How can I enhance the bubble painting activity?
To make the experience even more exciting, encourage kids to mix their own colors and add glitter for a sparkling effect! You can also set up a themed day where they create specific designs or patterns, making it a memorable, interactive art adventure!
Magical Bubble Painting Art for Kids: A Colorful DIY Adventure
Ingredients
Equipment
Method
- In a plastic cup or bowl, combine 2-3 tablespoons of dish soap, 0.25 cup of water, and a few drops of liquid watercolor or food coloring for each color. Stir gently to blend.
- Using a straw, carefully blow into the mixture to create bubbles. Aim for a bubbly layer just above the surface!
- Once bubbles are formed, press a piece of heavyweight paper onto the bubbles to create colorful imprints.
- Repeat the bubble creation and imprinting process with different colors, allowing each artwork to dry fully before continuing.
- Once the artwork has dried, display your colorful bubble art or store it flat.