DIY Bioplastic Suncatchers: Easy Nature-Inspired Eco Art
There’s a certain joy in bringing the vibrant beauty of nature indoors, and that’s exactly what our DIY Bioplastic Suncatchers promise to do. I discovered this eco-friendly project one sunny afternoon while rummaging through my garden, feeling the warmth of the sun and the gentle whisper of the breeze. With just a few simple ingredients, these suncatchers not only celebrate the colors and textures of the plants around us but are also biodegradable, making them a wonderful choice for eco-conscious crafters.
What’s even better? You can create these stunning pieces in less time than it takes to brew your morning coffee—just 20 minutes! This craft is perfect for anyone looking to break free from the mundane and add a splash of creativity to their windows. Get ready to immerse yourself in a world of vibrant petals and herbs; let’s transform your home into a stunning art gallery that shines bright with sunshine!
Why DIY Bioplastic Suncatchers Are a Must-Try?
Eco-Friendly: Embrace sustainability with this biodegradable craft, allowing your creativity to flourish while caring for the planet.
Quick and Simple: In just 20 minutes, you can craft beautiful suncatchers that brighten up any space without needing advanced skills.
Family Fun: A perfect project for all ages, bringing friends and family together for a delightful day of crafting.
Versatile Designs: Experiment with seasonal botanicals and color layers to create unique, eye-catching pieces that reflect your personal style.
Educational: This project is a fun way to teach kids about nature and environmental responsibility, fostering a love for the outdoors.
Start your eco-art journey today and discover more creative projects to explore with your loved ones!
DIY Bioplastic Suncatchers Ingredients
Craft your eco-friendly suncatchers with these simple ingredients!
For the Gelatin Mixture
- Unflavored gelatin powder – The main ingredient for structure and binding, ensuring your suncatchers hold their shape.
- Boiling water – Activates the gelatin for molding; freshly boiled water guarantees optimal dissolvement.
For the Natural Decorations
- Petals, leaves, herbs, twigs – Nature’s adornments for visual interest; forage for colorful shapes that inspire creativity.
For Molding and Displaying
- Plastic lids – Recycled molds for shaping your suncatchers; yogurt or sour cream lids work perfectly for this project.
- String or yarn – For creating a hanging loop; any durable string can turn your craft into a delightful display.
Optional Enhancements
- Food coloring – Adds a pop of color to your suncatchers; consider using natural dyes for a vibrant effect.
- Edible flowers, biodegradable glitter – Perfect for elevating the aesthetics; they introduce an enchanting touch of sparkle and beauty to your nature-inspired artwork.
Ready to dive into crafting these delightful DIY Bioplastic Suncatchers? Let’s bring the joy of nature into your home!
How to Make DIY Bioplastic Suncatchers
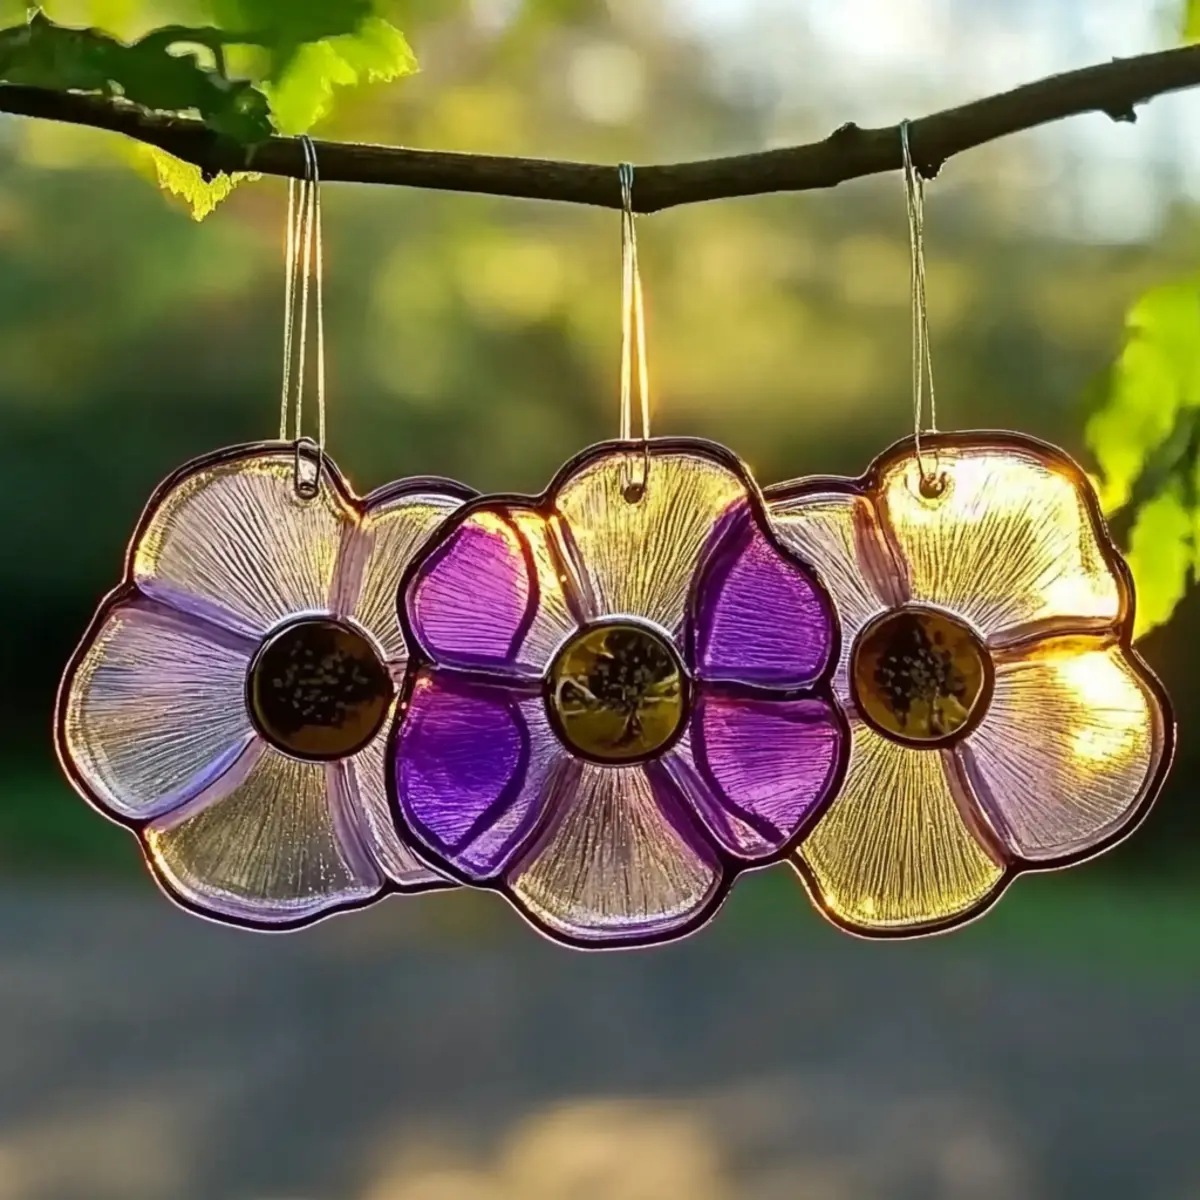
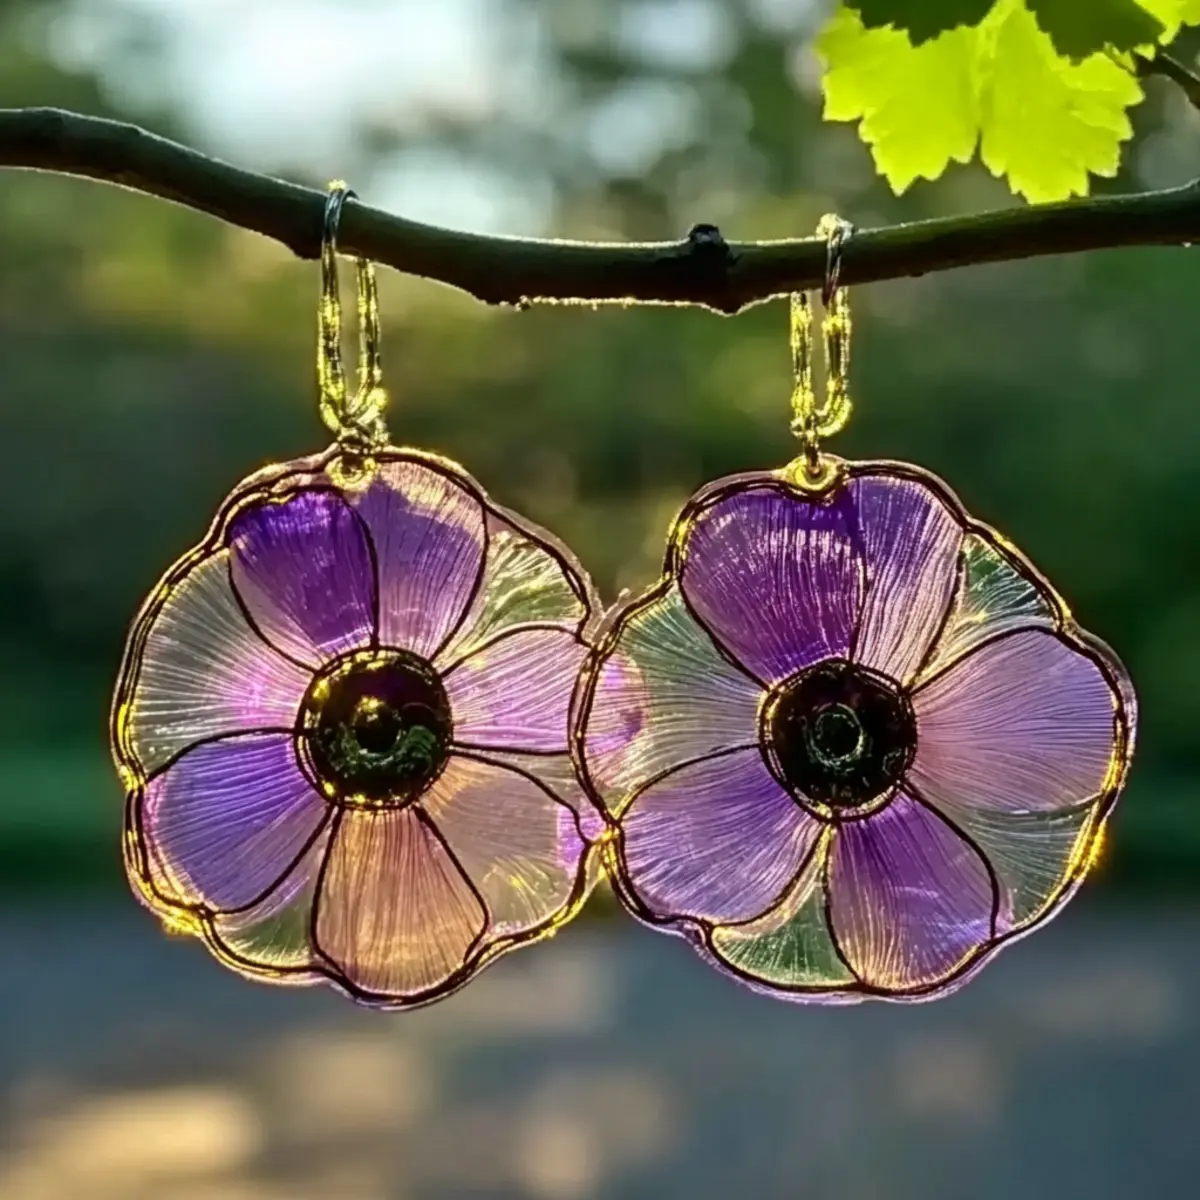
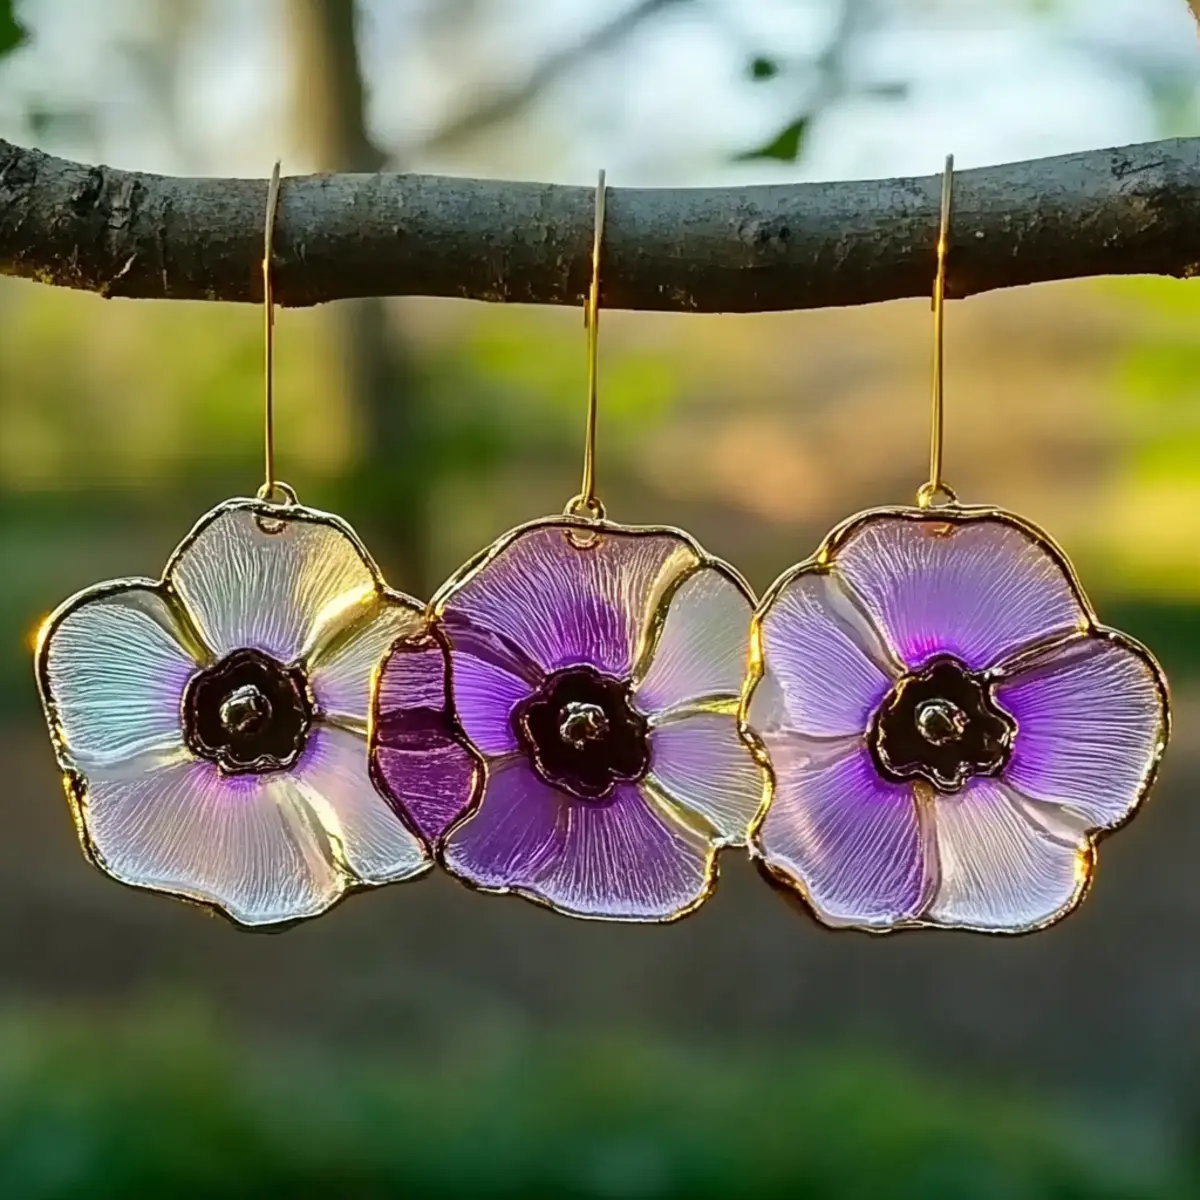
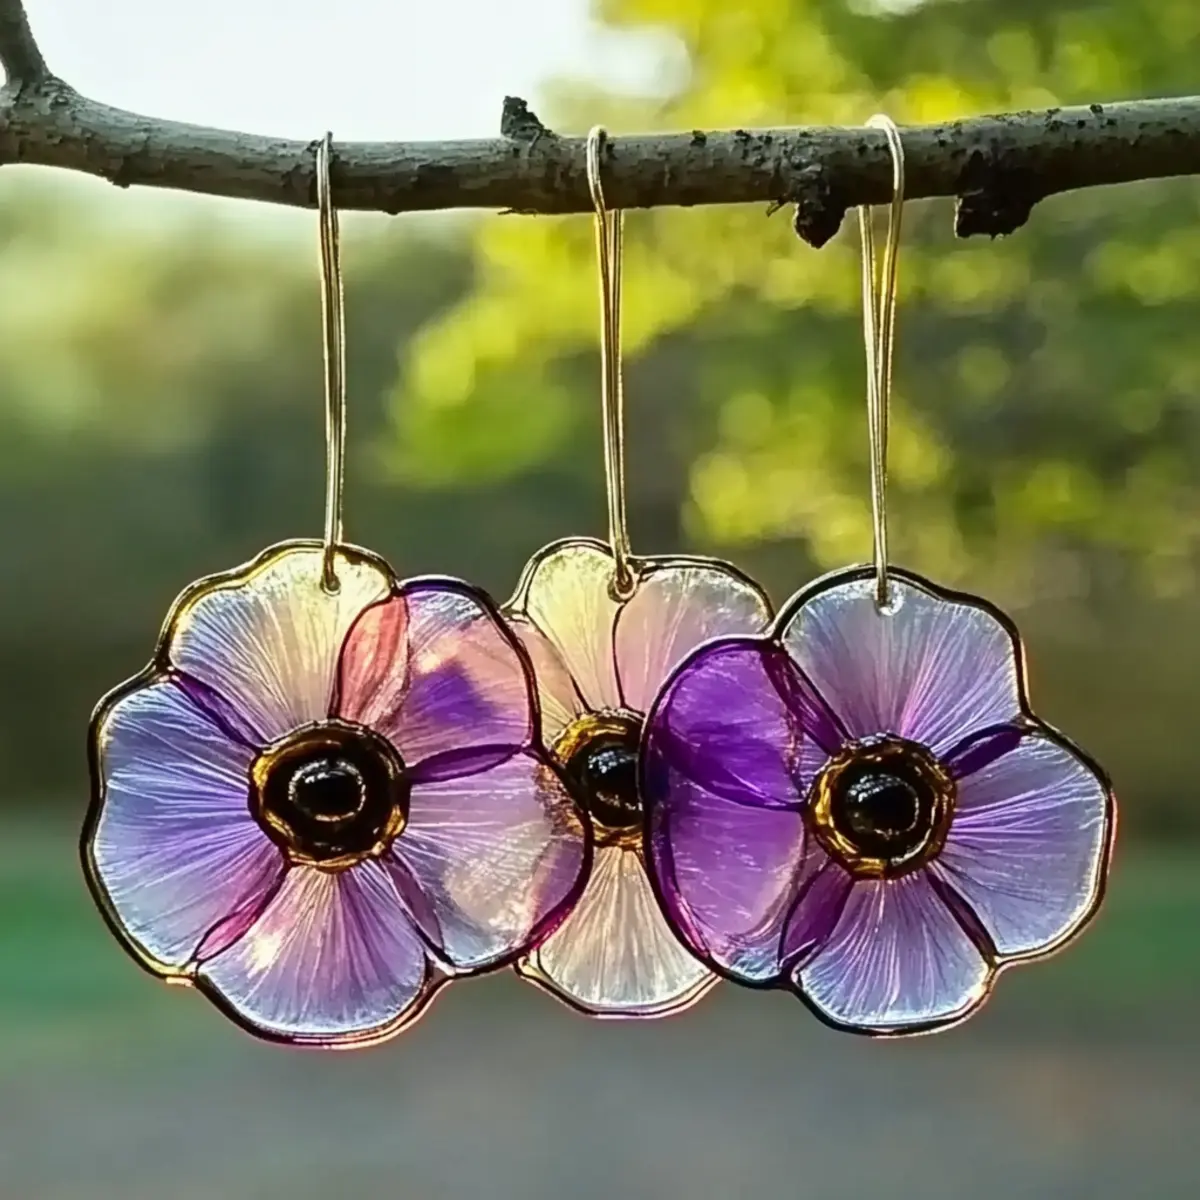
Forage Botanicals: Gather a variety of colorful petals, leaves, herbs, or tiny twigs from your garden or local park. Aim for a mix of colors and shapes to create stunning visual interest in your suncatchers.
Arrange Decorations: Position your gathered items inside clean plastic lids. Get creative with your arrangement—feel free to create a symmetrical pattern or go for an abstract design; let your artistic side shine!
Mix Gelatin: In a heat-safe bowl, combine 1 part unflavored gelatin powder with 4 parts boiling water. Stir gently until fully dissolved and smooth, ensuring there are no lumps in your mixture.
Pour Gelatin Mixture: Carefully pour the gelatin mixture over the botanicals in each lid, ensuring the natural items are completely submerged. This will secure them in place when the gelatin sets.
Add Hanging Loop: While the gelatin is still warm, press a small loop of string or yarn into the mixture. This will create a convenient hanging option for your finished suncatchers.
Drying Time: Allow your suncatchers to dry at room temperature for 24–48 hours. For even drying, remember to flip them midway through the drying process.
Remove and Display: Once the suncatchers are firm to the touch, gently remove them from the molds. Hang them in a sunny window and watch as they brighten up your space with beautiful colors!
Optional: Try layering different colors of gelatin for a vibrant effect!
Exact quantities are listed in the recipe card below.
Make Ahead Options
These DIY Bioplastic Suncatchers are perfect for busy crafters looking to save time! You can prepare the gelatin mixture and arrange the botanicals up to 24 hours in advance. Simply mix 1 part unflavored gelatin powder with 4 parts boiling water and pour it over your decorative items in the molds. To maintain their vibrant colors, cover the arranged lids with a damp cloth and refrigerate until you’re ready to pour the gelatin, ensuring everything stays fresh. When you’re ready to complete your suncatchers, just follow the final steps: insert the string loops and allow them to dry for 24–48 hours before displaying them. Enjoy the ease of crafting beautiful art while freeing up your schedule!
Proper Storage for DIY Bioplastic Suncatchers
Room Temperature: Display your suncatchers in a sunny window, where they can thrive and brighten your space. They are best enjoyed fresh, as they are temporary artworks.
Fridge: If you need to store them for a short period before displaying, keep them in an airtight container in the fridge for up to 3 days to prevent degradation.
Composting: Once they start to lose their vibrancy, compost the suncatchers responsibly. Since they’re biodegradable, they can return to the earth, completing their natural life cycle.
Display Tips: Avoid excessive moisture and direct sunlight for prolonged periods, as these can affect their vibrant colors. Enjoy and replace them for fresh creations!
Expert Tips for DIY Bioplastic Suncatchers
Choose Wisely: Select vibrant botanicals that maintain their color when preserved. Avoid browning leaves or wilted flowers to ensure your suncatchers look fresh and lively.
Gelatin Technique: Mix your unflavored gelatin with boiling water thoroughly to prevent lumps, ensuring the consistency is smooth for your DIY Bioplastic Suncatchers.
Cover While Drying: To avoid curling during the drying process, lightly cover the suncatchers with a breathable cloth. This keeps the humidity in check and enhances the final look.
Layering Fun: Experiment with colored gelatin layers for a stunning 3D effect. Just remember to let each layer set slightly before adding the next!
Natural Pressing: Press botanicals in a book before use to flatten them. This makes them easier to work with and maximizes their visibility in your art pieces.
Compost When Done: Remember, these suncatchers are temporary and biodegradable. Once they start to degrade, compost them responsibly to keep the cycle of nature flourishing.
What to Serve with DIY Bioplastic Suncatchers?
These eco-friendly crafts are not just projects; they’re vibrant expressions of nature that brighten your home and spark creativity.
- Sunshine Lemonade: A refreshing drink that complements the joyful colors of your suncatchers, perfect for sipping while crafting.
- Herbal Tea Time: Enjoying a warm cup of herbal tea creates a cozy atmosphere, enhancing the soothing experience of your crafting session.
- Fruit Platter: A colorful array of seasonal fruits mirrors the natural beauty of your suncatchers, offering a healthy and delicious snack option.
- Nature Walk: Pair your crafting day with a nature walk. Gathering new botanicals fuels inspiration and deepens your connection to the environment.
- Colorful Snacks: Serve rainbow veggie sticks with a vibrant dip to keep the energy high while you craft. They’re both tasty and visually appealing.
- Family Craft Challenge: Invite friends or family to join you in creating their own suncatchers, turning it into a joyous competition filled with laughter.
- Picnic Style Setup: Spread out a picnic blanket outdoors as a delightful environment for enjoying refreshments while you and the kids craft together.
- Nature-Inspired Music Playlist: Create a playlist of calming sounds or nature-inspired tunes to set the perfect crafting mood while you work on your suncatchers.
- Crafting Goody Bags: Prepare a small treat bag with eco-friendly materials for friends who join your crafting day, making the experience unforgettable.
- Garden Decor: Once completed, display your suncatchers in your garden alongside vibrant flowers, creating a beautiful outdoor art gallery.
DIY Bioplastic Suncatchers Variations & Substitutions
Feel free to get creative and make this project truly your own with these fun twists!
Seasonal Botanicals: Use whatever flowers, leaves, and herbs are in bloom to reflect the seasons. Sunflowers in summer or maple leaves in fall create stunning effects.
Layered Colors: Create a multi-layered gelatin effect by letting one layer set before pouring another. This adds depth and drama to your suncatchers.
Herbal Infusions: Combine edible herbs like mint or basil for a fragrant twist. Not only do they look beautiful, but they also introduce delightful scents.
Vibrant Natural Dyes: Use natural colorants like beet juice or turmeric for added color without artificial ingredients. This way, you can create a beautiful palette that’s also eco-friendly.
Textured Patterns: Press botanicals flat before placing them in the molds for different textures. This enhances the visual intrigue and makes your suncatchers even more captivating.
Twigs and Grasses: Experiment with twigs or dried grasses for a rustic look. These elements mimic the natural beauty of the great outdoors and can offer charming contrast.
Biodegradable Glitter: Add a sprinkle of biodegradable glitter to your gelatin mixture for a magical touch that sparkles in the sunlight.
Personal Touch: Include small sentimental items like feathers or tiny shells to personalize your suncatchers, making them unique keepsakes that tell your story.
DIY Bioplastic Suncatchers Recipe FAQs
How do I choose the right botanicals for my suncatchers?
Absolutely! When foraging, aim for vibrant petals, leaves, herbs, or twigs that have appealing shapes and colors. Avoid wilted or browning botanicals, as they tend to lose their beauty when preserved. I often pick flowers like pansies or ferns, as they hold up well and look stunning in the finished suncatchers!
How should I store my DIY bioplastic suncatchers?
For best results, display your suncatchers in a sunny window. They thrive in the light and bring color to your space. If you need to store them temporarily, place them in an airtight container in the fridge for up to 3 days to slow down any degradation. Once you notice they start to fade, remember to compost them responsibly!
Can I freeze my suncatchers?
It’s not ideal to freeze these suncatchers, as freezing can cause the gelatin to break down, affecting their shape and transparency. They are designed to be temporary artwork. Simply allow them to dry fully and display them, enjoying the natural beauty until they degrade, which usually takes a couple of weeks to months depending on conditions.
What are some troubleshooting tips if my gelatin lumps up during mixing?
Very! If your gelatin mixture forms lumps, the key is to mix thoroughly. First, sprinkle the gelatin powder slowly into the boiling water while continuously stirring. If lumps still occur, you can gently heat the mixture on low heat while stirring until they dissolve. Avoid microwaving, as this can create uneven heat.
Are there any dietary considerations I should be aware of when making suncatchers?
Absolutely, it’s wise to be mindful! While making DIY bioplastic suncatchers, ensure you’re using biodegradable and non-toxic ingredients, especially if children or pets are involved. It’s also worth noting that while it’s safe for nature, do explain to kids that these are not for eating—just beautiful to look at!
DIY Bioplastic Suncatchers: Easy Nature-Inspired Eco Art
Ingredients
Equipment
Method
- Forage Botanicals: Gather a variety of colorful petals, leaves, herbs, or tiny twigs from your garden or local park.
- Arrange Decorations: Position your gathered items inside clean plastic lids.
- Mix Gelatin: In a heat-safe bowl, combine 1 part unflavored gelatin powder with 4 parts boiling water.
- Pour Gelatin Mixture: Carefully pour the gelatin mixture over the botanicals in each lid.
- Add Hanging Loop: While the gelatin is still warm, press a small loop of string or yarn into the mixture.
- Drying Time: Allow your suncatchers to dry at room temperature for 24–48 hours.
- Remove and Display: Once firm, gently remove them from the molds.