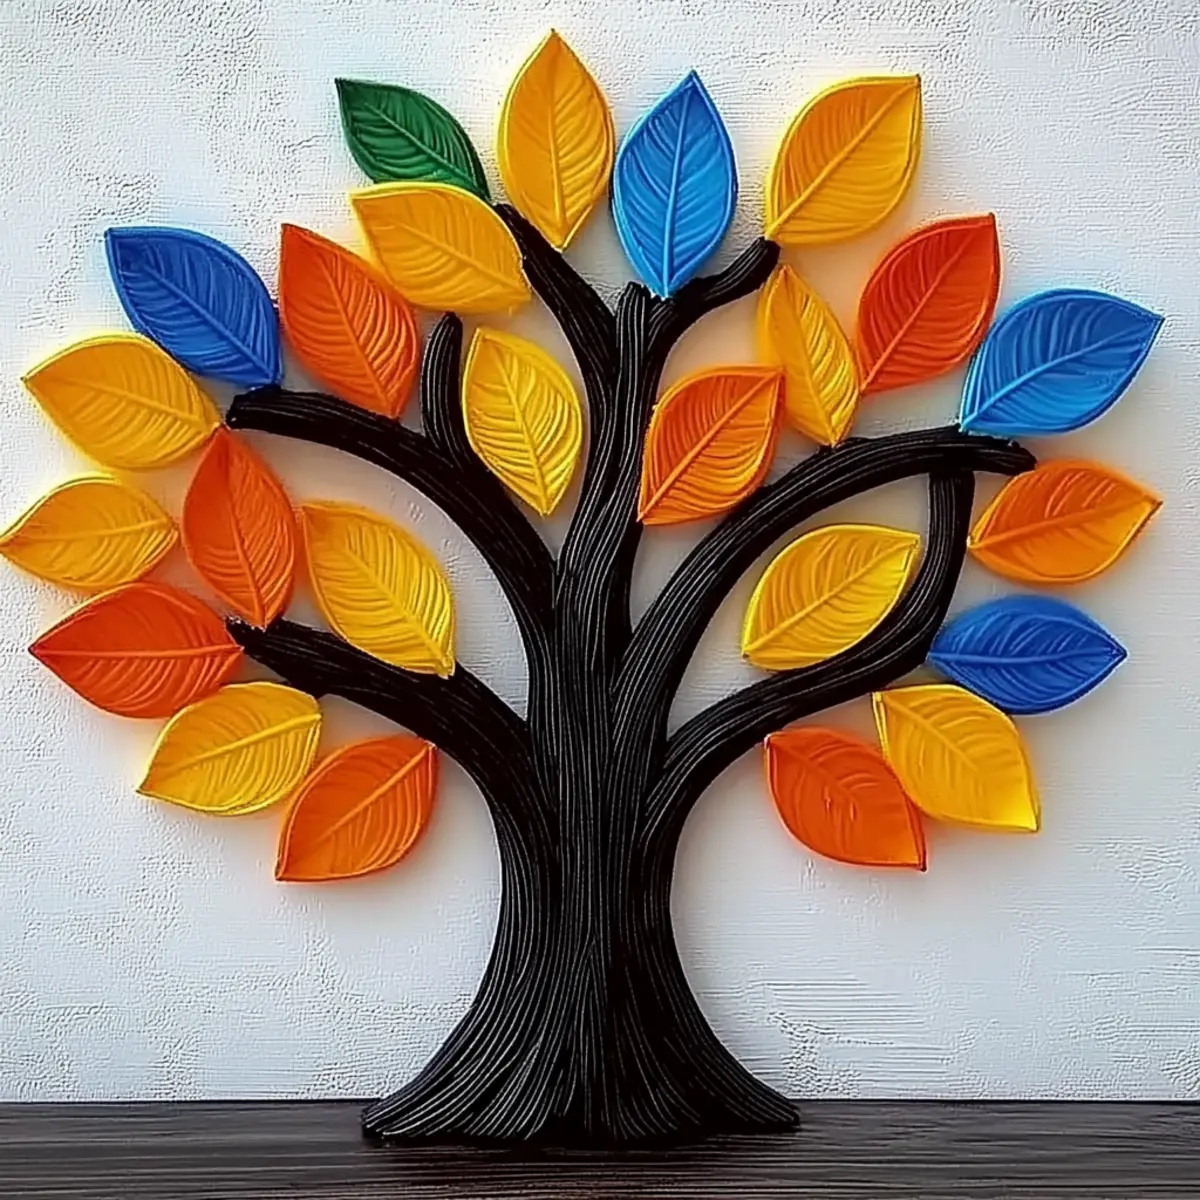
DIY Fall Tree Craft – A Colorful Autumn Keepsake for All Ages
As the crispness of autumn air settles in and the leaves paint the landscape with vibrant hues, I find myself yearning for creative activities that capture the season’s spirit. One such delight is this DIY Fall Tree Craft, where clean, dry pumpkin seeds transform into a colorful keepsake that the entire family can enjoy. This hands-on project not only unleashes our artistic sides but also breathes new life into those pumpkin seeds we often toss aside after Halloween.
Imagine sprinkling reds, oranges, and yellows onto a whimsical tree, creating a piece that reflects the beauty of the season! Quick to prepare and easy to personalize, this craft is perfect for both chilly afternoons at home or lively gatherings with friends. How sweet it is to see children’s eyes light up as they glue their vibrant creations onto sturdy cardstock. Ready to dive into this fun seasonal project? Let’s get started and make some autumn magic together! 🍁🌳

Why love this DIY Fall Tree Craft?
Creativity Unleashed: This colorful project sparks imaginations, granting everyone the freedom to personalize their trees with unique designs.
Family Fun: It’s an engaging group activity—perfect for weekends or cozy evenings that bring family members together.
Seasonal Spirit: Celebrate autumn’s beauty as you create a vibrant keepsake that captures the heart of the season.
Easy Prep: With simple materials and straightforward steps, this craft is accessible to all skill levels.
Upcycled Joy: Transform pumpkin seeds that would otherwise be discarded into something beautiful and meaningful!
Versatile Designs: Experiment with seasonal color themes, or use additional decorative items for a one-of-a-kind masterpiece. Dive deeper into crafting by exploring my other fun ideas!
DIY Fall Tree Craft Ingredients
• Gather your materials and let’s get crafting!
For the Tree Base
- Clean, dry pumpkin seeds – These serve as the vibrant ornaments for your tree; be sure to save them from your pumpkin carving!
- White cardstock – Creates the sturdy base of your tree structure.
For Coloring the Seeds
- Vinegar – Helps food coloring stick to the seeds for bold, vibrant hues.
- Food coloring – Choose fall colors like reds, oranges, and yellows to match the beauty of autumn.
- Ziplock bags – Ideal for shaking to coat the seeds evenly with your color mixture.
For Decorating
- Brown paint or marker – Use this to craft the tree trunk and branches, giving your creation an earthy touch.
- Glue – Essential for securing the colorful seeds onto the cardstock; school or tacky glue works best.
For Drying and Finishing
- Paper towels – Perfect for drying the colored seeds after the dyeing process.
- Optional textures – Twigs, pinecones, or moss can be used to add a natural touch to your tree design.
Let’s keep the creativity flowing with this DIY Fall Tree Craft, turning pumpkins seeds into artwork cherishing the seasonal spirit! 🍁🌳
How to Make the DIY Fall Tree Craft
Prep Seeds: Start by collecting and thoroughly cleaning your pumpkin seeds. Ensure they are completely dry, as moisture can hinder the dyeing process.
Coloring: In a Ziplock bag, combine your clean seeds with a splash of vinegar and a few drops of food coloring. Shake the bag gently until the seeds are beautifully coated in color.
Drying: Spread the colored seeds out on paper towels in a single layer. Allow them to dry completely, which can take about 30 minutes.
Tree Base: Take the white cardstock and cut or fold it into a tree shape that suits your design. Secure it to a stable surface for decorating.
Decorate: Use your brown paint or marker to create the trunk and branches of your tree. Let this dry for a few minutes to avoid smudging.
Attach Seeds: Generously apply glue to the tree structure. Begin gluing the colored seeds onto your tree, arranging them as desired for a lively effect.
Finish Touches: Get creative by adding texture with twigs, pinecones, or moss to elevate the natural look of your whimsical tree.
Optional: Add glitter or sequins for a little sparkle!
Exact quantities are listed in the recipe card below.
Make Ahead Options
These DIY Fall Tree Crafts are perfect for those who like to prepare in advance! You can clean and dry your pumpkin seeds up to 3 days ahead of time, storing them in an airtight container to keep them fresh. Additionally, you can pre-mix the food coloring and vinegar in your Ziplock bags and refrigerate them overnight; this will save time on craft day. When you’re ready to finish the project, simply spread the seeds on paper towels to dry for about 30 minutes, craft your tree base, and glue the seeds on. This makes assembling your autumn keepsake quick and stress-free, allowing you to enjoy the seasonal spirit without the last-minute rush!
Storage Tips for DIY Fall Tree Craft
Dry Place: Store your finished DIY Fall Tree Craft in a cool, dry location to maintain its integrity and prevent any moisture damage.
Display: It’s best showcased as part of your seasonal decor, so consider placing it on a mantel or table where it can be admired.
Durability: If adequately stored, your colorful pumpkin seed creation can last for weeks, making it a charming keepsake for autumn celebrations.
Handling: When moving the craft, do so gently to avoid dislodging the glued seeds, ensuring your vibrant masterpiece stays intact.
Variations & Substitutions for DIY Fall Tree Craft
Customize your fall tree craft and unleash your imagination with these delightful twists!
- Spring Blossoms: Use pastel food coloring like light pinks and greens to create a soft spring theme, evoking the beauty of blooming flowers.
- Winter Wonderland: Swap traditional colors for sparkling white and icy blue hues to craft a magical snow-dusted winter tree. Add some faux snow for extra charm!
- Metallic Touch: Incorporate metallic paints or glitter into your design for a shimmering effect, making your tree truly stand out during festive gatherings.
- Nature’s Textures: Experiment by incorporating natural items like twigs, dried leaves, or acorns into your craft for an earthy feel that resonates with outdoor beauty.
- Mood Lighting: Attach small fairy lights around your tree for a luminous nighttime display that adds a cozy ambiance to your autumn evenings.
- Themed Ornaments: Add themed ornaments, such as mini pumpkins or scarecrow figures, to enhance the festive spirit and personalize your tree even more.
- Different Bases: Instead of cardstock, try using a cutting board or a small wooden plaque as the tree base for a more rustic look that brings warmth to your decor.
- Color Combos: Don’t hesitate to mix bright colors with darker shades to create depth in your design. Layering creates an eye-catching effect that will delight anyone who sees it!
What to Serve with DIY Colorful Pumpkin Seed Tree Craft?
This delightful craft is not just a project; it’s a cherished memory waiting to be made alongside your loved ones.
Apple Cider Donuts: These warm, spiced treats mimic the autumn aroma and pair wonderfully with an artistic fall afternoon. Enjoy the sweetness as you create!
Pumpkin Spice Latte: A seasonal favorite that envelops you in cozy flavors, enhancing your craft experience with warmth and spice.
Roasted Chestnuts: Savory and slightly sweet, chestnuts roasted over an open fire offer a nostalgic taste of fall, perfect for curling up during crafting sessions.
Maple Glazed Popcorn: Crunchy and sweet, this snack adds a playful touch to your crafting table, making it hard to resist grabbing another handful!
Cinnamon Hot Chocolate: Rich and soothing, this drink brings joy while you create, bringing warmth to your hands as you glue those colorful seeds.
Autumn Trail Mix: A mix of nuts, dried fruits, and chocolate bits provides a delightful crunch, making for a hearty snack to fuel your creativity.
Chai Tea: Earthy and spiced, chai tea pairs beautifully with the vibrant energy of your craft, wrapping you in comforting flavors as you work.
Sugared Pecan Cookies: These sweet bites echo the colors of your project, adding a touch of sweetness to your crafting table and delighting everyone involved.
Ready to craft memories that sparkle as brightly as the colors of your DIY tree? Let’s dive in! 🍁🌳
Expert Tips for DIY Fall Tree Craft
Seed Preparation: Ensure your pumpkin seeds are completely dry before starting, as moisture can prevent the food coloring from adhering well and lead to smudges.
Vibrant Colors: Experiment with different concentrations of food coloring to achieve the desired saturation. A little goes a long way, so start small!
Layering Techniques: When attaching the colored seeds, layer them for depth. This creates a more dynamic, eye-catching tree that’ll stand out in your seasonal decor.
Creative Variations: Feel free to mix and match colors or use additional decorations like glitter, twigs, or small ornaments for a more unique twist to your DIY Fall Tree Craft.
Family Involvement: Encourage each family member to decorate their section of the tree. This not only makes it more collaborative but also fosters a fun, shared creative experience!

DIY Fall Tree Craft Recipe FAQs
What type of pumpkin seeds should I use for this craft?
Absolutely, use clean, dry pumpkin seeds that you’ve saved from your pumpkin carving! Make sure they are free from any residue or moisture as this can affect the coloring process. If you’re buying seeds, ensure they’re raw and untreated for the best results.
How should I store my finished DIY Fall Tree Craft?
To maintain the integrity of your craft, store it in a cool, dry place—this helps prevent moisture damage. If you plan to display your tree, consider placing it on a mantel or table where it can be admired, as proper handling will keep it intact for weeks.
Can I freeze my DIY Fall Tree Craft for later use?
While freezing is not applicable for this craft, you can easily store your colored pumpkin seeds in an airtight container for future projects. They should remain in good condition for about 2-3 months if kept dry and away from moisture.
What should I do if the food coloring doesn’t adhere well to the seeds?
Very! If you find that colors aren’t sticking, double-check that the seeds are completely dry. Adding a bit more vinegar to the mix can also help with adherence. Experimenting with the amount of food coloring and vinegar may yield better results.
Are there any allergy considerations I should keep in mind?
Yes, if using food coloring, ensure it’s allergy-friendly, especially if crafting with kids or gifting this project. Additionally, if you’re incorporating any optional textures like pinecones or twigs, check for any allergies related to these natural materials.
Can I customize this craft further for different seasons?
Absolutely! This DIY Fall Tree Craft is versatile; try using pastel colors for spring blossoms or glitter for a winter tree theme. Personal touches such as unique decorative items will make your creation one-of-a-kind!

DIY Fall Tree Craft - A Colorful Autumn Keepsake for All Ages
Ingredients
Equipment
Method
- Collect and clean your pumpkin seeds thoroughly. Ensure they are completely dry.
- In a Ziplock bag, combine the clean seeds, a splash of vinegar, and a few drops of food coloring. Shake gently until coated.
- Spread the colored seeds on paper towels in a single layer and let them dry completely for about 30 minutes.
- Cut or fold the white cardstock into a tree shape and secure it to a stable surface.
- Use the brown paint or marker to create the trunk and branches, allowing it to dry for a few minutes.
- Apply glue to the tree structure and begin gluing the colored seeds in desired arrangements.
- Add optional textures with twigs, pinecones, or moss for a natural look.