Eco-Friendly Bioplastic Suncatchers: The Best Craft for Kids
As I stood by my window, the sunlight streamed in, casting cheerful rainbows across my kitchen walls. It was the perfect moment to bring a splash of creativity into my home—a wonderful way to transform ordinary hours into something magical. That’s when I stumbled upon the idea of crafting Bioplastic Suncatchers, a whimsical project that combines eco-friendliness with vibrant artistry. This DIY clear glue flower suncatcher is not just a delightful way to brighten your sunny spaces; it’s also a fantastic opportunity for you and your family to engage in sensory play and explore colors together.
With a few simple, natural ingredients, you’ll create stunning pieces that look like they belong in a gallery, yet are so easy to make! This craft is perfect for kids and adults alike, bringing joy and creativity to anyone looking to escape from the mundanity of takeout meals. Get ready to unleash your inner artist and decorate with beauty that shines brightly while being kind to the planet. Let’s gather our supplies and dive into this colorful adventure!
Why Choose Bioplastic Suncatchers for Your Home?
Eco-Friendly: Made with natural ingredients, these suncatchers contribute to a sustainable world.
Creative Fun: Perfect for sensory play, kids and adults can unleash their creativity together.
Vibrant Artistry: Your windows will come alive with dazzling colors, reminiscent of stained glass.
Simple Process: Just mix, pour, and let dry—no complex skills are needed!
Endless Variations: Personalize with pressed flowers, glitter, or seasonal themes for unique designs.
Memorable Experience: Crafting suncatchers creates lasting memories, making it a perfect family activity.
Bioplastic Suncatchers Ingredients
• Create captivating clear glue flower suncatchers with these natural ingredients!
- Water – Forms the base of your suncatcher gel; adjust the amount for your desired consistency.
- Cornstarch – Thickens the mixture for a smooth, gel-like texture crucial in crafting these bioplastic suncatchers.
- White Vinegar – Acts as a preservative and enhances clarity in your final piece.
- Unflavored Gelatin – Essential for structure, providing stability and a beautiful finish when dried.
- Natural/Food-Safe Coloring – Brightens your suncatcher; feel free to substitute with any safe dye for vibrant hues.
- Fine Glitter (optional) – Adds a sparkling touch and elevates the visual appeal of your creations.
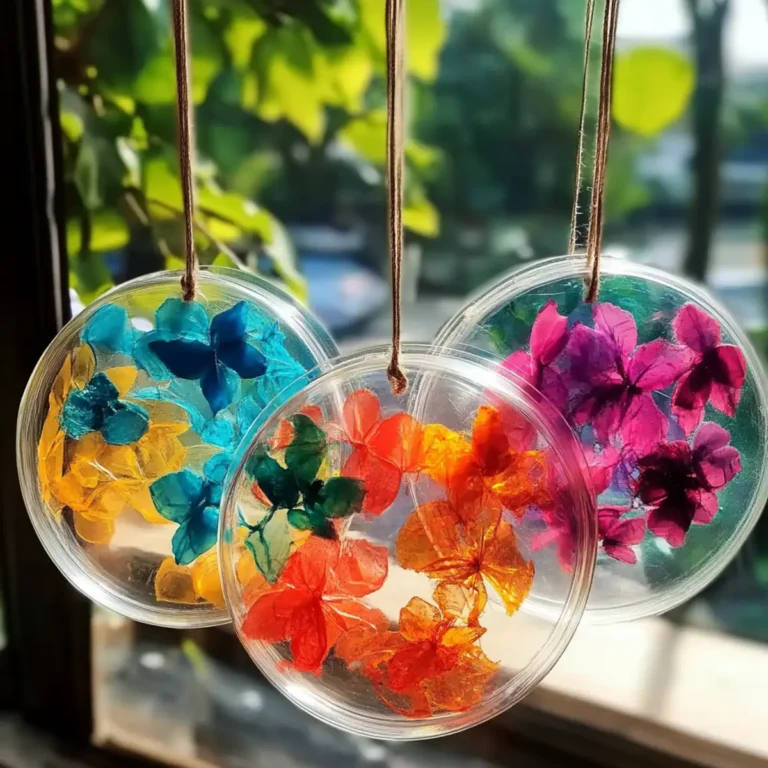
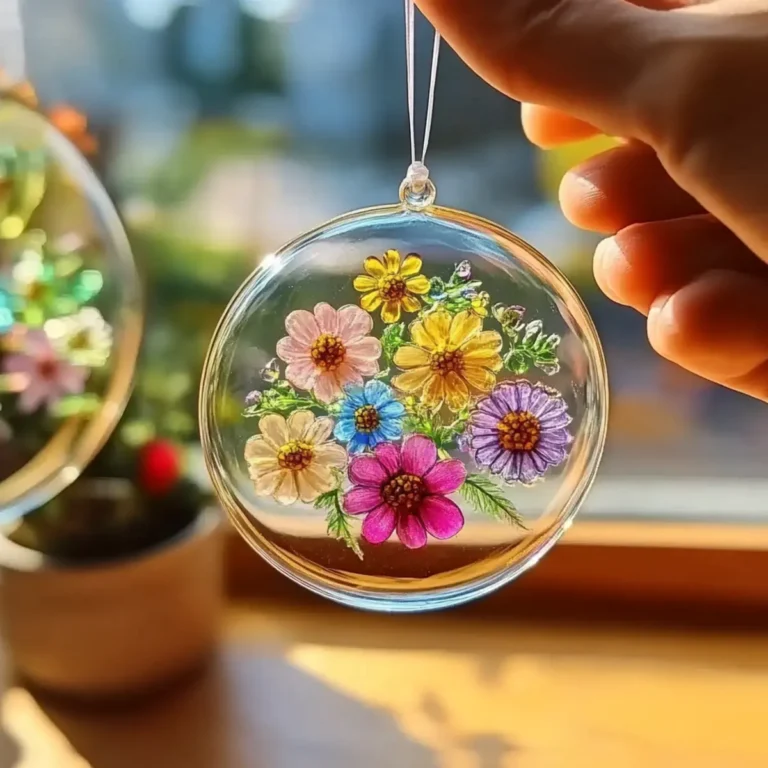
- Pressed Flower Petals (optional) – Introduces a natural aesthetic while offering lovely colors and textures.
- Tissue Paper Pieces (optional) – These can introduce extra pops of color and dimension to your artwork.
How to Make Bioplastic Suncatchers
Prepare Gel Mixture: In a medium-sized saucepan, combine water, cornstarch, white vinegar, and gelatin. Stir the mixture over low heat until everything is fully dissolved and a smooth gel forms.
Add Color: Once your gel is ready, divide it into small bowls. Add natural or food-safe coloring to each bowl as you desire, mixing thoroughly to achieve vibrant hues.
Pour and Arrange: Pour the colored gel onto a flat, clean surface. Spread it to your desired thickness, and enhance it by adding pressed flower petals and tissue paper pieces for additional color and texture.
Drying: Allow the suncatchers to dry for at least 24 hours. Ensure they’re spread in a thin layer for a clear and beautiful finish, free from bubbles.
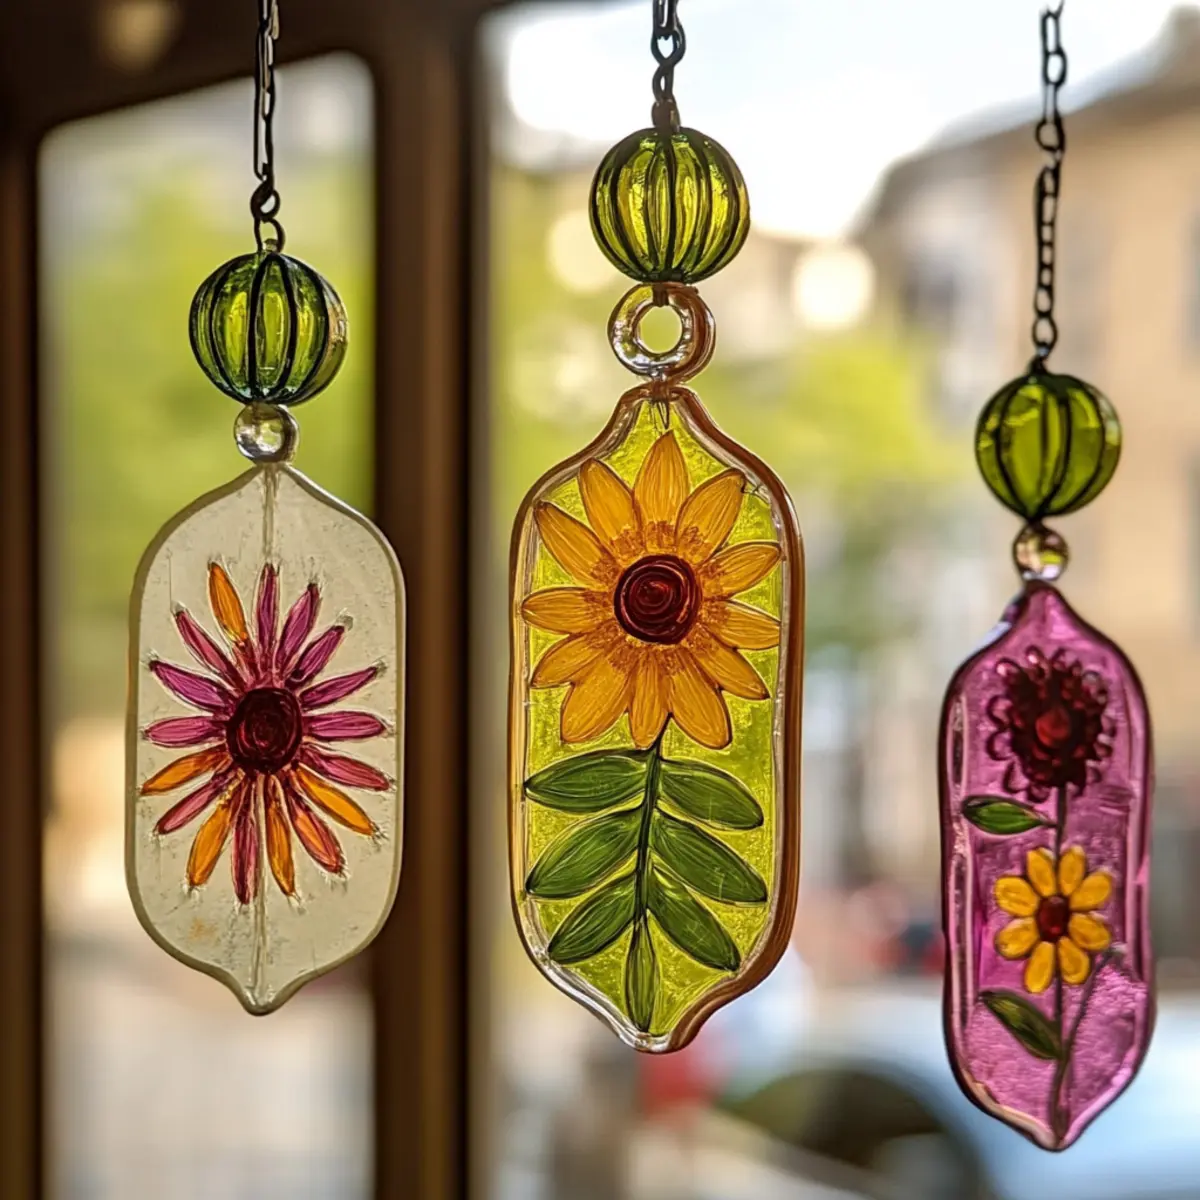
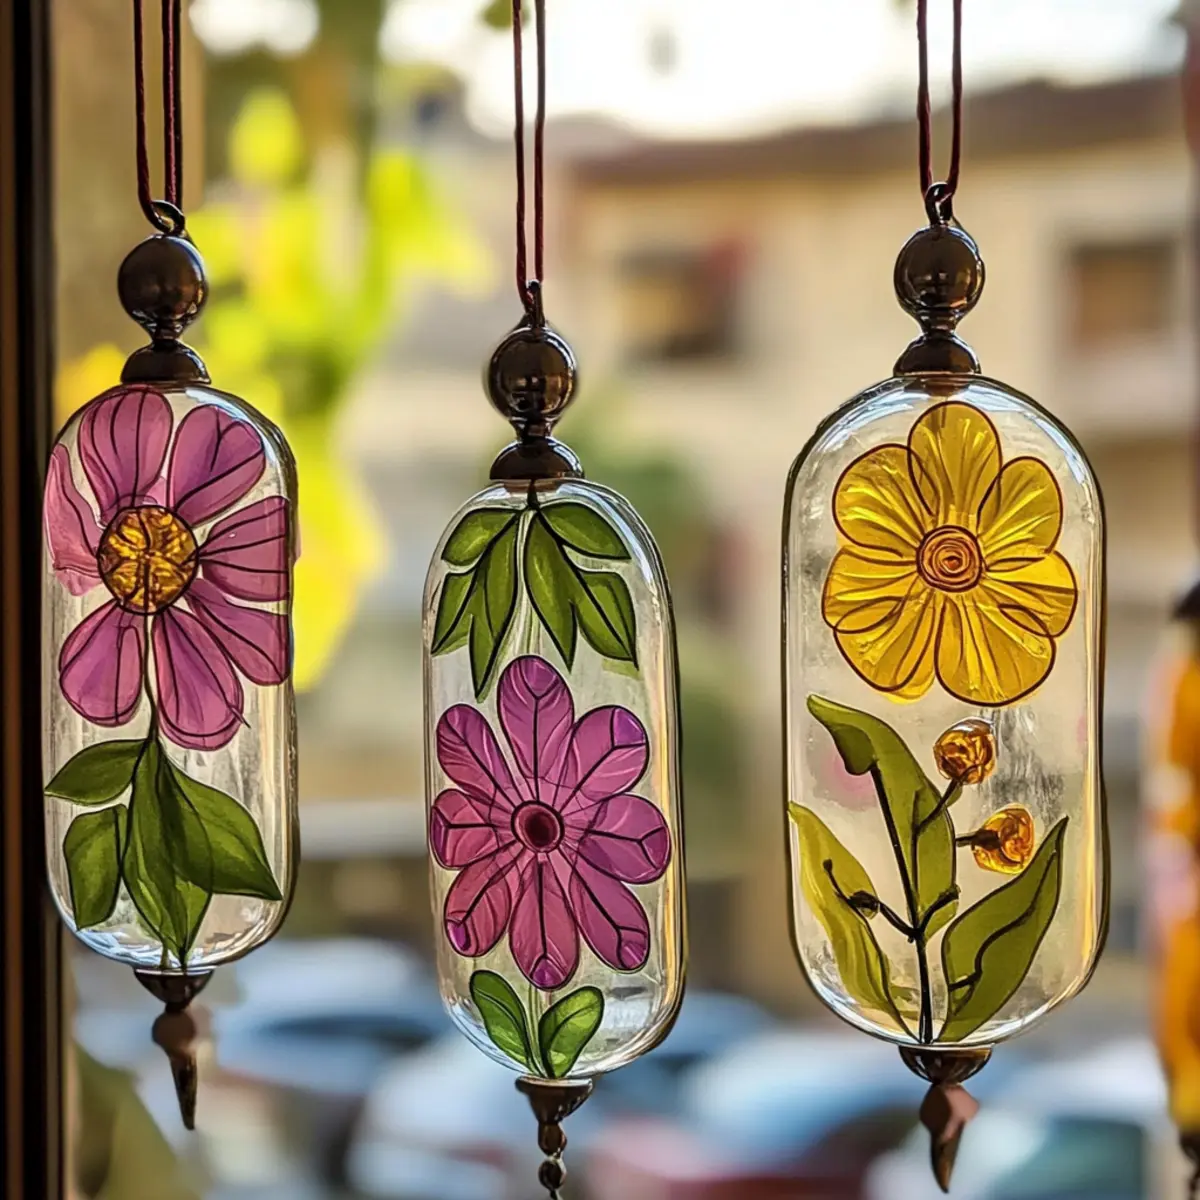
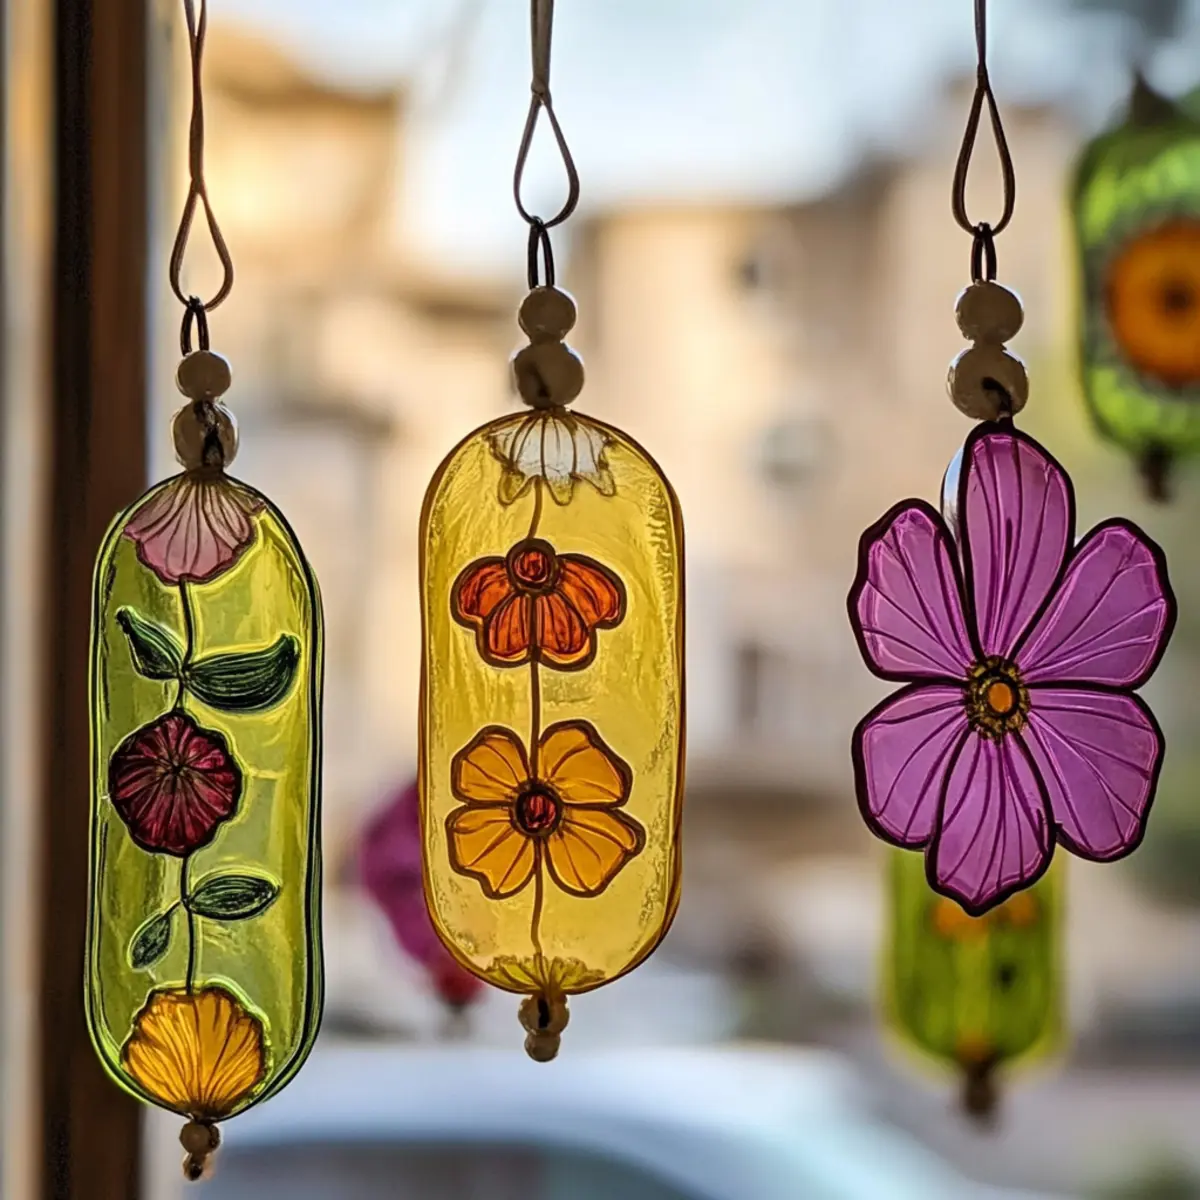
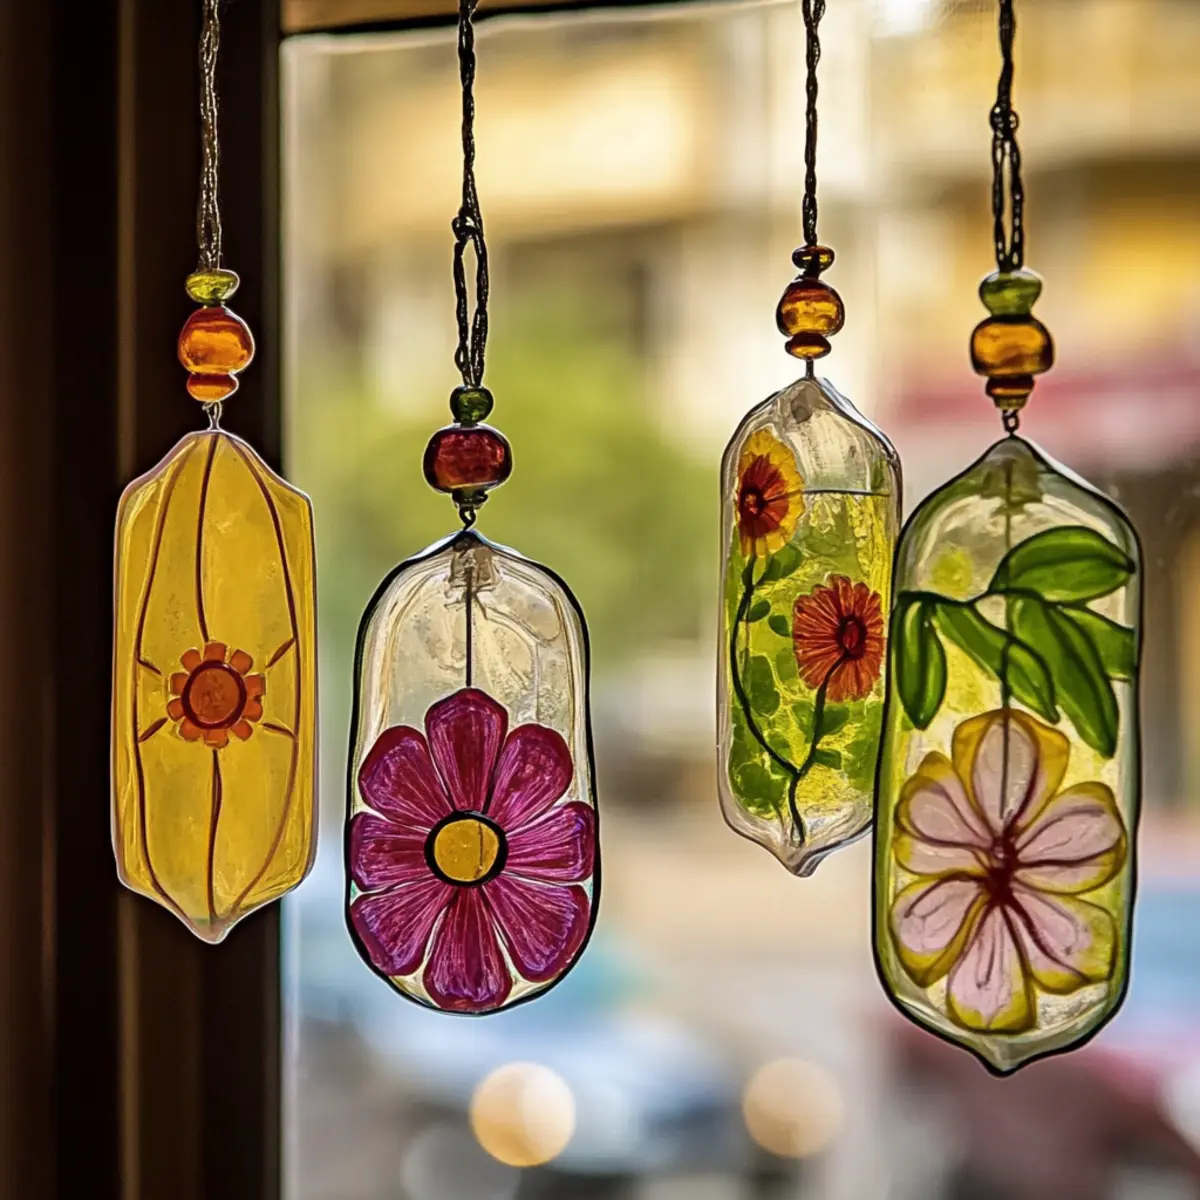
Remove and Display: Once dried, gently peel the suncatcher from the surface. Hang it in a sunny window, and enjoy the way it casts gleaming patterns around your home!
Optional: Add beads or sequins atop the gel before drying for a whimsical effect.
Exact quantities are listed in the recipe card below.
Make Ahead Options
These DIY Clear Glue Flower Suncatchers are perfect for busy home cooks who love to plan! You can prepare the gel mixture up to 3 days in advance by combining the water, cornstarch, white vinegar, and gelatin in a saucepan. Make sure to store it in an airtight container in the refrigerator to maintain its freshness and prevent it from drying out. When you’re ready to craft, simply reheat the gel mixture gently over low heat and then follow the steps to add color and create your suncatchers. Keeping the layers thin will ensure they dry clearly and beautifully, allowing you to create stunning decorations with minimal last-minute effort!
How to Store and Freeze Bioplastic Suncatchers
- Room Temperature: For best results, suncatchers should be displayed in sunny areas right away to maintain vibrant colors; avoid storing them at room temperature.
- Fridge: If you need to delay use, keep the suncatcher in a cool, dry place, but only for up to 2 days to prevent moisture damage.
- Freezer: Avoid freezing suncatchers, as the cold may cause cracking or distortion in the gel structure, ruining the beautiful finish.
- Reheating: If they’ve developed any bubbles, briefly warm them on a low setting using a hairdryer to smooth the surface, but do this with caution!
What to Serve with Bioplastic Suncatchers?
Bring your crafting session to life with delightful accompaniments that celebrate creativity and imagination.
Tropical Fruit Platter: A vibrant array of pineapple, mango, and kiwi adds a refreshing and colorful element to your crafting day.
Herbal Infusion Iced Tea: Brewed with fresh herbs like mint or basil, this drink offers a refreshing sip that complements your artistic endeavor.
Cheese and Crackers Board: A selection of creamy cheeses and crunchy crackers gives everyone a little something to nibble on, perfect for keeping energy high.
Rainbow Veggie Sticks with Hummus: Crisp, colorful veggies like carrots and bell peppers dipped in hummus provide a healthy and crunchy snack to fuel creativity.
Chocolate-Covered Pretzels: The sweet and salty combination is a fun treat that kids and adults alike can enjoy, making the crafting experience even more delightful.
Mini Cupcakes: Whimsical desserts, topped with bright frosting, reflect the joyous colors of your suncatchers and make for a celebratory treat.
Fruit Smoothies: Blend up colorful fruits for a delicious, nutritious drink that keeps everyone refreshed as they create their beautiful suncatchers.
Sugar Cookies: Simple yet delightful, these treats can be decorated with colorful icing to mirror your crafting colors, creating an edible art project!
Sparkling Lemonade: A bubbly beverage brings a festive touch, rejuvenating your spirits while surrounding you with the art of crafting and laughter.
Bioplastic Suncatchers: Variations & Substitutions
Feel free to let your imagination run wild while crafting—there’s no end to the customizations you can create!
- Seasonal Themes: Swap colors and add elements like fallen leaves for autumn or snowflakes for winter to match the season.
- Glitter Boost: Mix in various types of glitter or sequins for a dazzling sparkly finish that catches the eye.
- Herbal Touch: Incorporate dried herbs like lavender or rosemary for a delightful aroma and unique look.
- Color Mixing: Blend food-safe dyes to create stunning swirls and gradient effects that create visual interest.
- Texture Twists: Instead of flat pressed flowers, try using small twigs or seed pods for a rich, dimensional effect.
- Interactive Elements: Add pieces of clear plastic beads within the gel to create fun, movable elements when the suncatcher is hung.
- Heat Level Variation: Infuse your elixir with vibrant, spicy hues by adding cayenne or beet juice for unexpected colors (but beware, these will tint your hands!).
- Eco-Coloring: Experiment with natural dyes made from fruits and vegetables to keep the project entirely eco-friendly while adding fascinating colors.
Helpful Tricks for Bioplastic Suncatchers
- Gel Consistency: Adjust water amounts carefully; too much makes the gel thin, while too little yields a thick mixture that may not dry properly.
- Spreading Technique: Use a spatula to evenly spread the gel, ensuring a smooth finish and preventing traps for air bubbles.
- Layer Wisely: Thin layers of gel dry faster and clearer than thick layers. Aim for an even application to achieve beautiful results.
- Color Blending: Experiment with combining colors for unique looks. Remember, darker colors may take longer to dry completely.
- Cleaning Up: Work in a dedicated crafting area to prevent mess and have all your materials organized before starting the bioplastic suncatcher project.
- Safety First: Ensure all your supplies, especially for coloring, are non-toxic and safe for craft use, especially when kids are involved.
Bioplastic Suncatchers Recipe FAQs
What kind of water should I use for my suncatchers?
You can use regular tap water for this project! It’s essential to mix it well with the cornstarch, vinegar, and gelatin to create a smooth gel. If your tap water has a strong mineral taste, feel free to use filtered water for clearer gel results.
How should I store my suncatchers after making them?
To keep your suncatchers vibrant, it’s best to display them in a sunny spot immediately. If you need to store them, place them in a cool, dry place for up to 2 days, avoiding moisture buildup that could ruin their integrity. If left at room temperature for too long, they may not maintain their color quality or might become tacky.
Can I freeze my bioplastic suncatchers?
Unfortunately, I wouldn’t recommend freezing your suncatchers. Freezing can cause the gelatin to crack or lose its beautiful shape. Instead, allow them to dry completely before displaying them in a sunny window.
What can I do if my gel has bubbles after drying?
If your suncatcher develops bubbles, all is not lost! You can use a hairdryer on a low heat setting. Gently warm the surface of the suncatcher for just a few seconds—this will help smooth out any imperfections. Just be careful not to overheat it, as too much heat can warp the gel.
Are there any safety considerations when making these suncatchers?
Absolutely! When crafting with kids, ensure that all materials, especially coloring agents, are non-toxic and safe for craft use. Always supervise the process, so everyone enjoys this fun activity without any safety concerns. If someone in your family has allergies, double-check the ingredients and any additives used in the craft.
Can I replace the gelatin with another ingredient?
Yes, you can! If you prefer a vegan alternative, you can substitute unflavoured gelatin with agar-agar, which is derived from seaweed. Keep in mind that the consistency might vary slightly, so follow package instructions for the right proportions to achieve a good gel-like texture.
Eco-Friendly Bioplastic Suncatchers: The Best Craft for Kids
Ingredients
Equipment
Method
- Prepare Gel Mixture: In a medium-sized saucepan, combine water, cornstarch, white vinegar, and gelatin. Stir over low heat until dissolved.
- Add Color: Divide gel into small bowls and mix in natural or food-safe coloring.
- Pour and Arrange: Pour the colored gel onto a flat, clean surface and add pressed flower petals and tissue paper pieces.
- Drying: Allow the suncatchers to dry for at least 24 hours.
- Remove and Display: Once dried, peel off the suncatcher and hang it in a sunny window.