Bioplastic Suncatchers: The Ultimate Eco-Friendly Craft Fun
The joy of creating something beautiful can be incredibly fulfilling, especially when it involves a sustainable twist. That’s precisely what you’ll experience with these Eco-Friendly Bioplastic Suncatchers. As I stirred the mixture of cornstarch and water on a quiet afternoon, bursts of colorful inspiration began to flow. This simple, natural craft is not just a feast for the eyes; it also sparks creativity and teaches children the importance of sustainability.
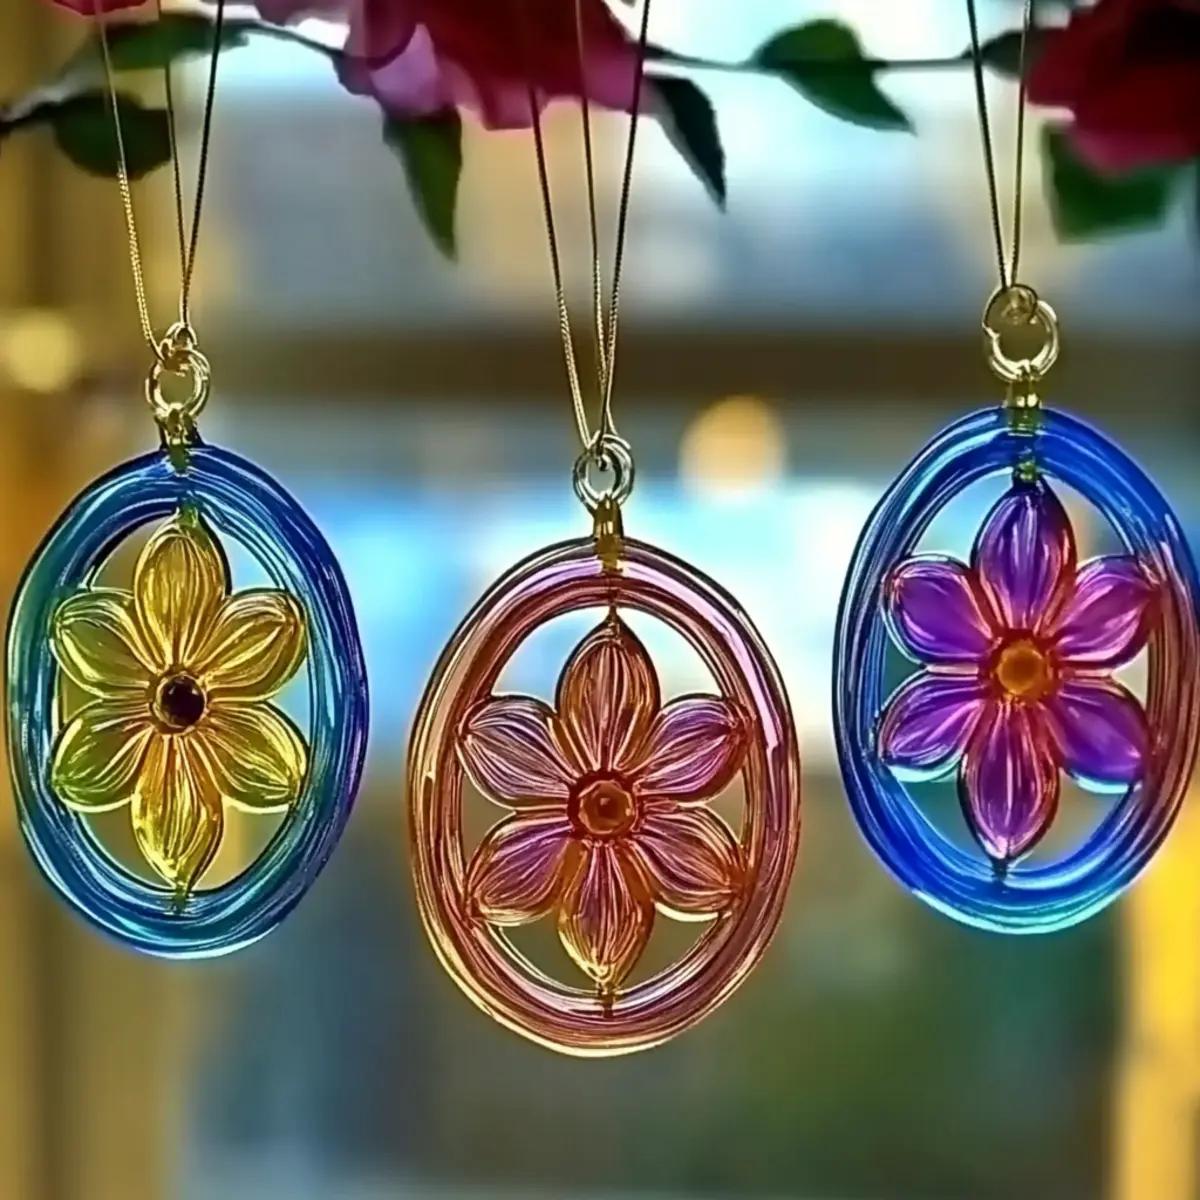
In just 15 minutes, you can transform basic ingredients into glossy, vibrant decorations that catch sunlight like stained glass. Imagine hanging these delightful suncatchers in your windows, casting a cheerful glow throughout your home while knowing you’ve contributed to a healthier planet. Let’s dive into this fun and eco-conscious activity that brightens up your space and inspires creativity—all while being completely non-toxic and compostable! 🌞

Why Choose Bioplastic Suncatchers for Your Crafts?
Creativity Unleashed: These bioplastic suncatchers are an imaginative way to express yourself and involve kids in the crafting process.
Quick to Make: With a mere 15 minutes of prep, you can dive into this eco-friendly project that’s perfect for all skill levels.
Educational and Fun: It’s not just art; it’s a lesson in sustainability, teaching children about eco-friendly materials while they create.
Customizable Joy: Feel free to play with colors and designs—add natural dyes or pressed flowers, making each piece uniquely yours!
Safe for Everyone: Completely non-toxic and compostable, these suncatchers are perfect for homes and classrooms alike.
Bring a little sunshine into your life with this vibrant craft! Whether you’re decorating your home or hosting a crafting session with friends, these simple creations will surely brighten your day.
Bioplastic Suncatcher Ingredients
For the Mixture
• Cornstarch – Provides structure and stability to your bioplastic suncatchers; arrowroot starch can be used as a substitute.
• Water – Acts as the primary mixing base; no substitutions recommended for this recipe.
• White Vinegar – Serves as a preservative to ensure the integrity of the mixture; lemon juice can be a substitute, but may affect color.
• Vegetable Glycerin – Contributes to the transparency and glossiness of the final product; stick with vegetable glycerin for best results.For Color Customization
• Food Coloring (Optional) – Adds vibrant hues to your suncatchers; consider using natural dyes for an earth-friendly alternative.
These simple ingredients not only create striking bioplastic suncatchers but also teach valuable lessons in sustainability, making crafting a fun and positive experience!
How to Make Bioplastic Suncatchers
Combine Ingredients: In a non-stick saucepan, mix 1/2 cup of cornstarch, 1/2 cup of water, 1 tablespoon of white vinegar, and 1 tablespoon of vegetable glycerin. Stir until fully blended into a smooth consistency.
Heat the Mixture: Place the pan over medium heat and stir continuously for 5–7 minutes. Watch for it to thicken into a gel-like paste, making sure not to let it burn.
Add Color: Remove the saucepan from heat, then add your desired food coloring or natural dye. If you want different colors, divide the mixture into smaller bowls and mix each color separately.
Spread Mixture: Pour the mixture onto wax paper, a silicone mat, or into molds. Use a spoon or craft stick to spread it into a thin, even layer for best results.
Decorate the Suncatcher: While the mixture is still wet, get creative! Decorate with glitter or other embellishments and use additional colors for a marbled effect if you wish.
Dry Thoroughly: Allow the suncatchers to dry for 24–48 hours until they are completely dry, glossy, and non-sticky. Be patient; this step is crucial for good results.
Cut Shapes: Once fully dry, carefully peel the suncatchers from the surface. Use scissors or craft punches to cut them into your desired shapes.
Display Your Artwork: Finally, adhere the suncatchers to a sunny window using tape or suction hooks to enjoy a splash of color all day long!
Optional: Adding pressed flowers can enhance the beauty and texture of your suncatchers.
Exact quantities are listed in the recipe card below.

Make Ahead Options
These Eco-Friendly Bioplastic Suncatchers are perfect for busy home cooks looking to streamline their crafting time! You can prepare the mixture—combining 1/2 cup cornstarch, 1/2 cup water, 1 tablespoon white vinegar, and 1 tablespoon vegetable glycerin—up to 24 hours in advance. Simply store it in an airtight container in the refrigerator to prevent drying. When you’re ready to create, reheat the mixture over medium heat, stirring until it reaches a gel-like consistency. Then, add your desired food coloring or natural dyes, pour it onto your chosen surface, and let it dry for 24–48 hours. With a little prep, you’ll have stunning suncatchers that are just as delightful and glossy as if made fresh!
What to Serve with Bioplastic Suncatchers?
Brighten up your crafting day with these delightful suncatchers and enjoy some light, refreshing treats alongside.
Fruit Skewers: Colorful and nutritious, fruit skewers are a fun snack that echoes the vibrant hues of your suncatchers.
Herbal Lemonade: A refreshing, herbal-infused lemonade will keep you hydrated and complement the sunny vibes of your craft.
Veggie Wraps: Crisp veggie wraps filled with fresh greens and hummus offer a light and healthy bite—perfect for an afternoon of creativity.
Cheese and Crackers: Create an elegant snack plate with a variety of cheeses and crunchy crackers to keep energy levels up while crafting.
Granola Bars: These chewy delights are easy to grab in between crafting sessions, providing a sweet boost that keeps you going.
Mocktail Spritzers: Enjoy a fizzy and colorful mocktail to mirror the cheerful splashes of color in your suncatchers; a blend of sparkling water and fruit juice works beautifully.
Just as your suncatchers sparkle in the sunlight, these treats will lighten the atmosphere and add to the joy of your crafting experience!
Helpful Tricks for Bioplastic Suncatchers
Use Non-Stick Surfaces: Always opt for wax paper or silicone mats to ensure your bioplastic suncatchers release easily and maintain their shape.
Color Mixing: For vibrant hues, mix in natural dyes or biodegradable glitter. This not only enhances aesthetics but also keeps your craft eco-friendly!
Dry Completely: Allow ample drying time of 24-48 hours to prevent your suncatchers from tearing when cutting. Rushing this step can lead to disappointment.
Storage Matters: Keep your completed suncatchers in a cool, dry place away from sunlight to keep them fresh, extending their lifespan and preserving their brilliance.
Be Creative: Experiment with adding natural embellishments like pressed flowers or leaves before the mixture sets, creating a unique and textured look for each suncatcher.
Storage Tips for Bioplastic Suncatchers
Room Temperature: Keep your completed suncatchers in a dry area away from direct sunlight to prevent any fading and prolong their vibrant colors.
Fridge: If the weather is particularly humid, you may store them in the fridge for a short duration, up to a week, to help maintain their integrity.
Freezer: Freezing is not recommended for bioplastic suncatchers, as it may alter their texture and beauty upon thawing.
Reheating: If necessary, you can lightly warm them in an oven at a low temperature for a few minutes to restore their flexibility, but avoid overheating to maintain their glossy finish.
Bioplastic Suncatchers Variations & Substitutions
Embrace your creative spirit by customizing these enchanting suncatchers to suit your taste and style!
Natural Dyes: Substitute food coloring with beet juice or spinach juice for a vibrant, earthy palette. It’s fun to experiment with colors from nature!
Floral Additions: Incorporate pressed flowers or leaves into the mixture before it sets, creating a beautiful textured design. This adds a lovely botanical touch!
Arrowroot Starch: Swap cornstarch for arrowroot if you’re looking for a different starch; it works wonders while keeping the recipe eco-friendly.
Citrus Twist: Use lemon juice instead of white vinegar to add a fresh scent, but be mindful it may slightly alter the color of your suncatchers.
Glycerin Alternatives: If vegetable glycerin isn’t available, try using other clear, non-toxic binders. Just ensure they are safe for crafting!
Textured Layers: Pour a thin layer, allow it to set slightly, then pour a second color on top for a layered marbled effect. It’s a feast for the eyes!
Biodegradable Glitter: Elevate your suncatchers with biodegradable glitter to add sparkle without harming the environment. Can you imagine how they’ll shimmer in the sunlight?
Colorful Swirls: While the mixture is wet, use a toothpick or skewer to swirl in additional colors for stunning effects that mimic stained glass. Enjoy the artistic process!

Eco-Friendly Bioplastic Suncatchers Recipe FAQs
What type of cornstarch should I use for bioplastic suncatchers?
You can use regular cornstarch, which is ideal for this recipe, but if you prefer, arrowroot starch can be substituted with similar results. Just ensure that your starch is pure without any additives for the best texture.
How should I store my bioplastic suncatchers?
Store your completed suncatchers in a dry area at room temperature, away from direct sunlight, to prevent fading and to maintain their vibrant colors. If your home is particularly humid, you can keep them in the fridge for short-term storage, up to one week.
Can I freeze bioplastic suncatchers?
Freezing is not recommended for bioplastic suncatchers, as it can change their texture and beauty when thawed. If you find them slightly misshapen, you can warm them gently in an oven at a low temperature for just a few minutes to restore flexibility.
What should I do if my suncatchers are tearing while cutting?
If you notice tearing, it may be due to insufficient drying time. It’s essential to let your suncatchers dry completely for 24–48 hours without disturbance. If they’re still soft, allow more drying time. I often lay them flat to ensure even drying.
Can I use bioplastic suncatchers outdoors?
While these suncatchers are made from non-toxic materials, I recommend using them indoors or in shaded areas as direct sunlight can fade colors over time. They shine beautifully in natural light but might not withstand weather conditions like rain or high humidity.
Bioplastic Suncatchers: The Ultimate Eco-Friendly Craft Fun
Ingredients
Equipment
Method
- Combine Ingredients: In a non-stick saucepan, mix 1/2 cup of cornstarch, 1/2 cup of water, 1 tablespoon of white vinegar, and 1 tablespoon of vegetable glycerin. Stir until fully blended into a smooth consistency.
- Heat the Mixture: Place the pan over medium heat and stir continuously for 5–7 minutes. Watch for it to thicken into a gel-like paste, making sure not to let it burn.
- Add Color: Remove the saucepan from heat, then add your desired food coloring or natural dye. If you want different colors, divide the mixture into smaller bowls and mix each color separately.
- Spread Mixture: Pour the mixture onto wax paper, a silicone mat, or into molds. Use a spoon or craft stick to spread it into a thin, even layer for best results.
- Decorate the Suncatcher: While the mixture is still wet, get creative! Decorate with glitter or other embellishments and use additional colors for a marbled effect if you wish.
- Dry Thoroughly: Allow the suncatchers to dry for 24–48 hours until they are completely dry, glossy, and non-sticky. Be patient; this step is crucial for good results.
- Cut Shapes: Once fully dry, carefully peel the suncatchers from the surface. Use scissors or craft punches to cut them into your desired shapes.
- Display Your Artwork: Finally, adhere the suncatchers to a sunny window using tape or suction hooks to enjoy a splash of color all day long!