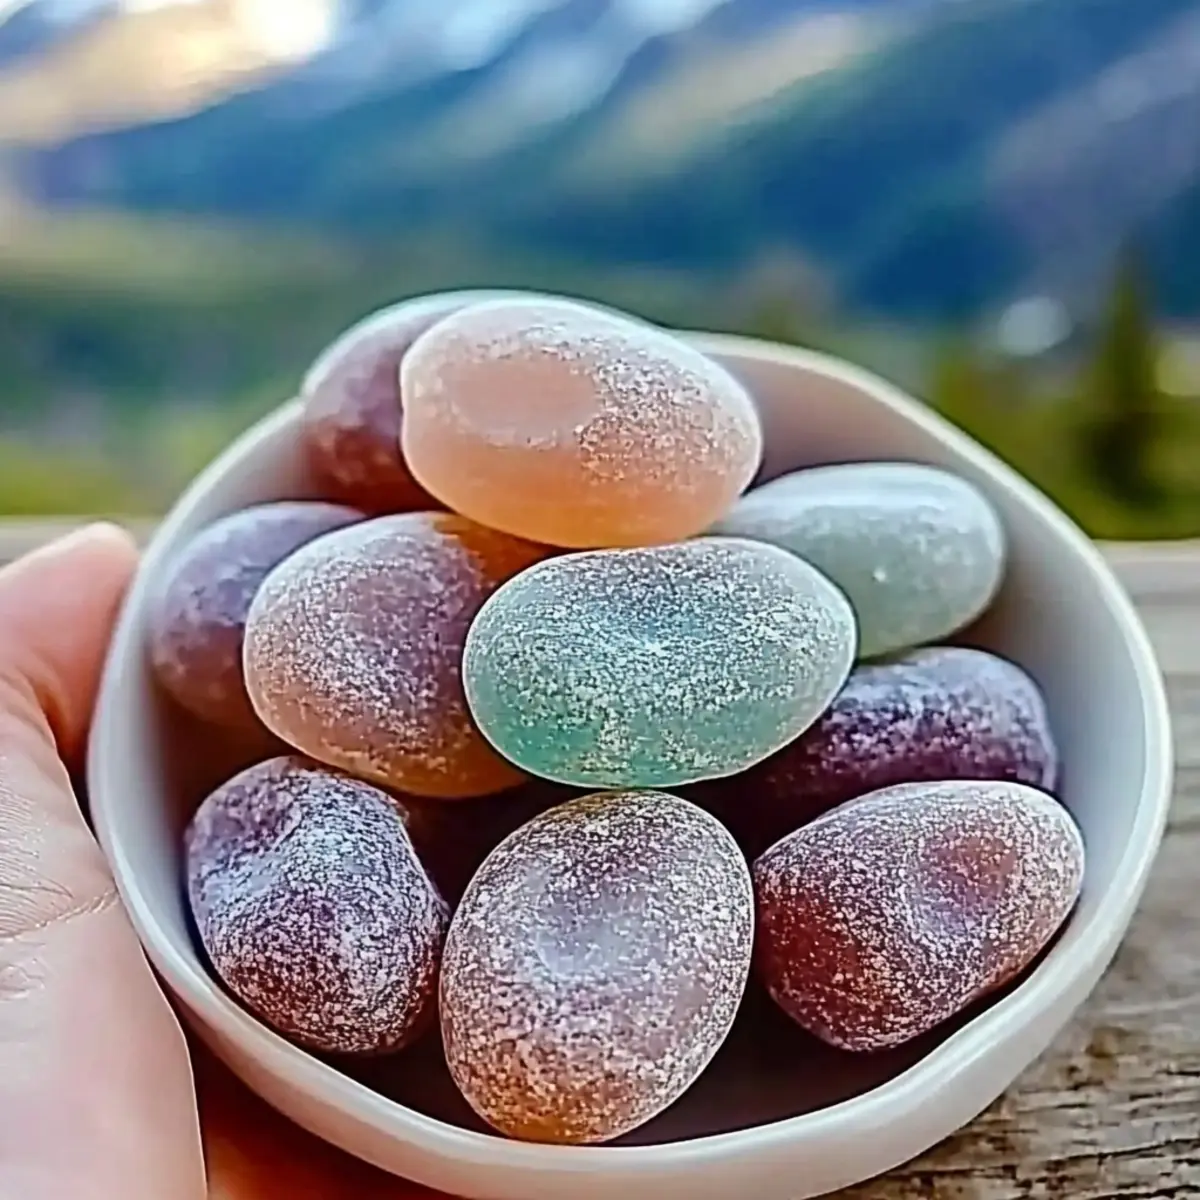
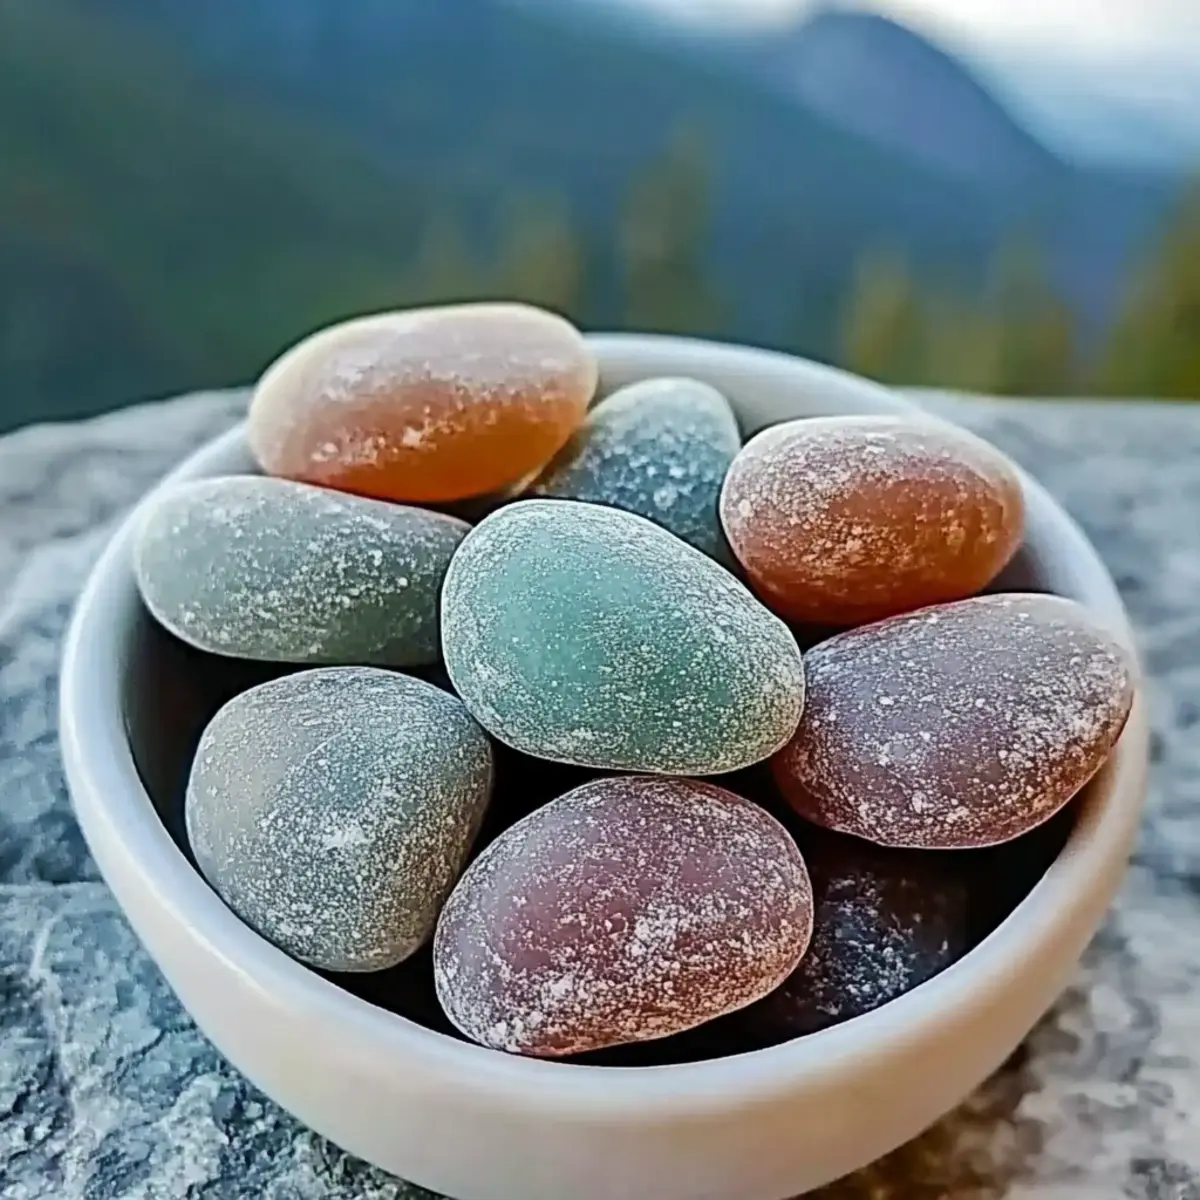
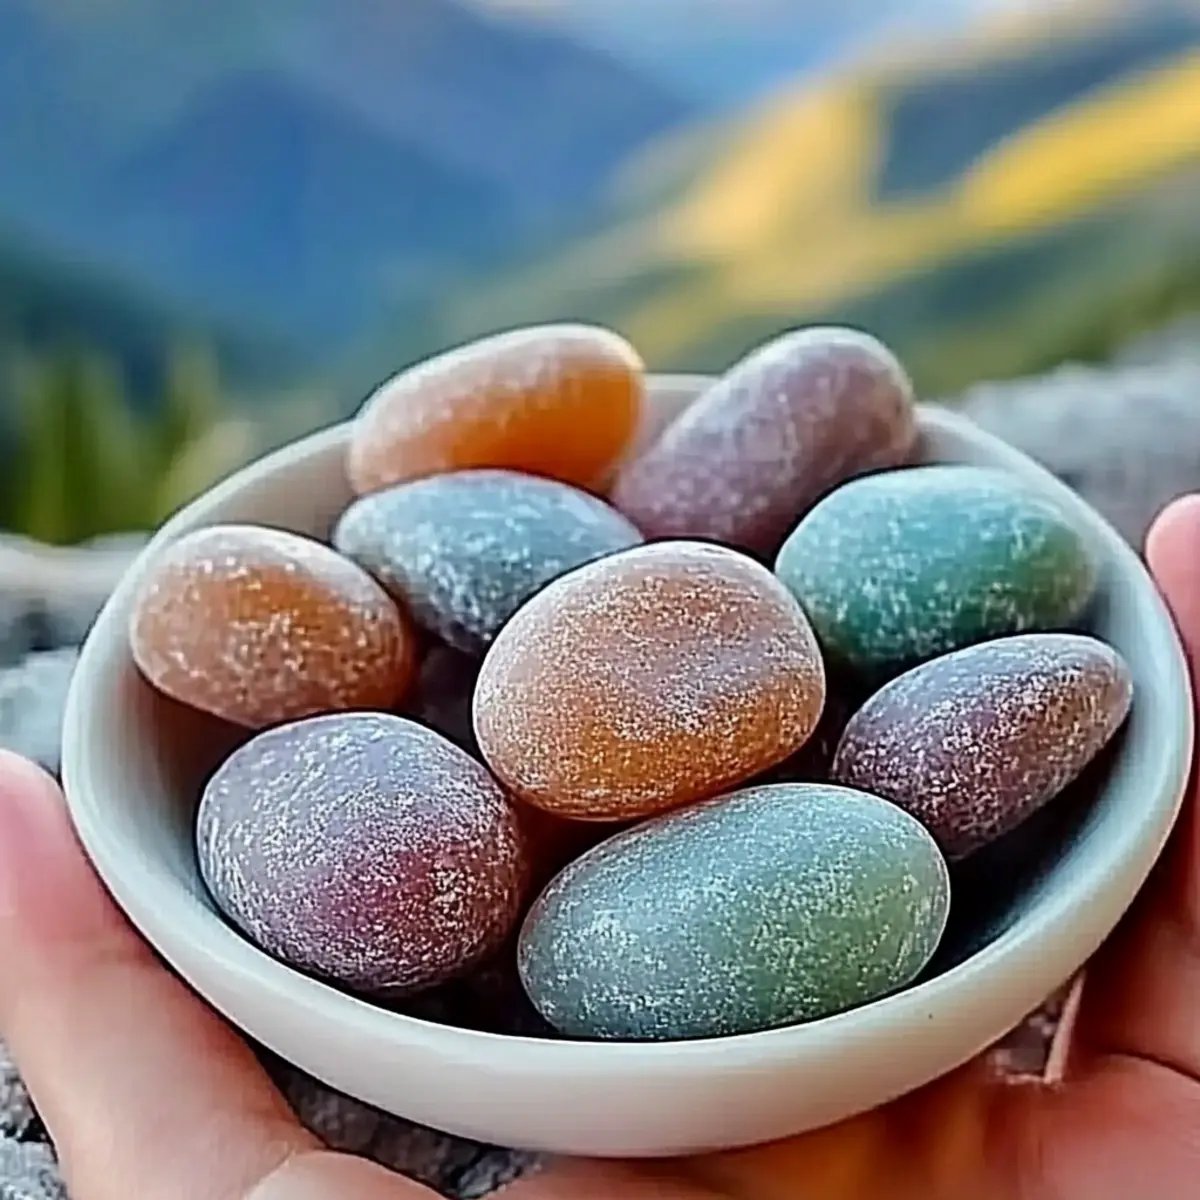
Vibrant DIY Aroma Stones: Easy Scented Crafts for Home Decor
When the sun starts to shine a little brighter each day, I can’t help but feel inspired to spruce up my living space. It was during one of these creative bursts that I stumbled upon the idea of DIY aroma stones—a project that blends crafting with home decor while filling my home with delightful scents. These colorful stones, made with just a few simple ingredients like flour, salt, and your favorite essential oils, are not just easy to craft; they offer a unique way to personalize your home.
From vibrant colors that can brighten up any corner to scents that transport you to your happiest place, these aroma stones are the perfect way to engage your kids in crafting while adding a decorative twist. Plus, with countless options for color and fragrance combinations, the possibilities are virtually endless! Let’s dive into this fun and simple DIY project that’ll transform your home and leave a refreshing aroma in the air.
Why DIY Aroma Stones Excite You?
DIY Aroma Stones are not only delightful to make but also elevate your home decor!
Fun for All Ages: Whether you’re crafting with kids or solo, this project brings joy to everyone involved.
Scent Personalization: Customize your stones with your favorite essential oils for a unique aromatic experience.
Vibrant Colors: Choose from an array of hues to match your home’s aesthetic, ensuring a visually stunning outcome.
Versatile Decor: Use them as centerpieces or garden accents—these stones fit effortlessly in any setting.
Simple Ingredients: With just flour, salt, and a few other kitchen staples, you can create magic with minimal fuss.
Ready to explore more charming crafts? Check out our creative DIY projects for more inspiration!
DIY Aroma Stones Ingredients
For the Dough
• White All-Purpose Flour – Provides the foundation needed for crafting your stones; swap in gluten-free flour for a gluten-free option.
• Salt – Essential for hardening the stones as they dry; using sea salt can add a rustic, coarse texture.
• Cornstarch – Gives your dough a smooth finish and helps bind everything together; arrowroot powder can work as an alternative.
• Cooled Boiled Water – Activates the dry ingredients and helps blend everything seamlessly; let it cool completely to ensure proper dough consistency.For the Aroma
• Essential Oils – Infuses delightful scents into your stones; feel free to mix and match your favorite fragrances for a custom feel.For the Color
• Mica Powder or Food Coloring – Brings vibrant shades to your stones; consider using gel food coloring for bolder hues.
With these simple ingredients, you’ll be ready to embark on your DIY aroma stones adventure, creating beautiful and fragrant home decor that speaks to your personal style!
How to Make DIY Aroma Stones
Mix Dry Ingredients: In a large bowl, begin your crafting journey by combining the white all-purpose flour, salt, and cornstarch. This creates a solid base for your stones, ensuring they’re both durable and easy to mold.
Add Wet Ingredients: Gradually pour in the cooled boiled water while stirring. Mix until the ingredients come together to form a soft, pliable dough. Aim for a consistency that holds together but isn’t too sticky.
Incorporate Scents and Colors: Next, enhance your stones by adding your chosen essential oils and mica powder or food coloring. Mix thoroughly until the colors are evenly distributed and the scents are fragrant, brightening up your crafting area!
Shape the Stones: Now it’s time to get creative! Roll the dough into individual stone shapes, making sure they have uniform thickness (about 1/2 inch) for even drying. Let your imagination soar—different shapes can spark joy!
Dry the Stones: Place your shaped stones on a drying rack or lined baking sheet. Allow them to dry for 12 hours, or until they’re completely hard and ready for display. The longer they dry, the sturdier they’ll become!
Store Finished Stones: Once your stones are dried and crafted to perfection, store them in a cool, dry place. This ensures they retain their charming colors and delightful aromas for longer!
Optional: Add a sprinkle of glitter before drying for a magical touch!
Exact quantities are listed in the recipe card below.

How to Store and Freeze DIY Aroma Stones
Cool, Dry Place: Store your finished DIY aroma stones in a cool, dry area to maintain their fragrance and prevent moisture damage.
Long-Term Storage: If you want to keep them for an extended period, place the stones in an airtight container, shielding them from humidity and dust.
Freezer Option: Although not necessary, you can store them in the freezer for added protection, keeping them safe for several months. Just allow them to return to room temperature before displaying or using.
Reheating: If you want to freshen up the scent, place them in a warm area for a short time without direct heat. Enjoy the delightful aroma once again!
Expert Tips for DIY Aroma Stones
Knead for Smoothness: Ensure to knead the dough well until it’s smooth. This prevents clumping, allowing for evenly shaped DIY aroma stones.
Humidity Check: Monitor the drying area for humidity, which can prolong drying time. Choose a well-ventilated space for optimal results.
Use Molds for Shape: Consider using silicone molds for fun and specific shapes. This can help achieve consistent sizes and enhance the visual appeal of your aroma stones.
Color Layering: For a unique look, experiment with layering colors. Just add different hues in sections while shaping to create beautiful marbled effects.
Fragrance Variety: Mix and match essential oils for customizable scents—don’t hesitate to blend your favorites before adding them to the dough!
Drying Surface Care: Use parchment paper or a silicone mat for drying to prevent sticking, making it easier to remove your finished DIY aroma stones once dried.
What to Serve with DIY Aroma Stones?
Bring your home to life with vibrant decorations that fill the air with delightful scents!
- Charming Display Bowls: Use beautiful ceramic or wooden bowls to showcase your colorful stones, adding an artistic touch to any room.
- Essential Oil Diffuser: Pair your aroma stones with a stylish diffuser to create a layered aromatic experience throughout your home.
- Natural Candles: Light unscented or complementary-scented candles alongside your aroma stones for a cozy ambiance that enhances the scent profile.
- Decorative Vases: Display your stones in clear glass vases, allowing their vibrant colors to shine while providing a lovely, eye-catching centerpiece.
- Nature-Inspired Decor: Place the stones among potted plants or terrariums to bring a pop of color to your greenery and highlight nature’s beauty.
- Seasonal Decor Baskets: Create themed decorations by filling baskets with stones in seasonal colors, effortlessly transitioning your home decor throughout the year.
Engage in the creativity of crafting while adorning your space with these charming DIY aroma stones!
DIY Aroma Stones Variations
Feel free to get creative and add your personal touch to these delightful aroma stones.
Seasonal Scents: Use essential oils like cinnamon for fall or lavender for spring to evoke the season’s essence.
Splash of Citrus: Incorporate orange or grapefruit essential oils to brighten your stones with fresher, zesty fragrances.
Textured Twists: Mix in sand or glitter for added texture and a touch of sparkle. Kids will love the magical effect!
Colorful Themes: Coordinate your colors for holidays, using red and green for Christmas or pastels for Easter, creating themed decorations.
Floral Fragrance: Experiment with floral essential oils such as rose or jasmine for a romantic atmosphere—perfect for special occasions!
Herbal Boost: Add dried herbs like rosemary or thyme into your dough for a delightful, rustic scent that brings nature indoors.
Layered Colors: Create beautiful marbled stones by incorporating different colors of mica in layers. Each stone becomes a unique masterpiece!
Eco-Friendly Choices: Opt for natural dyes like beet juice or turmeric for coloring instead of artificial food colorings—better for the planet and your home!
Embrace your creative spirit and let each stone reflect your unique style and personality!
Make Ahead Options
Preparing your DIY Aroma Stones ahead of time is a fantastic way to save time, especially during busy crafting sessions with kids. You can mix the dry ingredients (flour, salt, cornstarch) and store them in an airtight container for up to 3 days before you plan to craft. When you’re ready to create, simply add the cooled boiled water, essential oils, and color, then follow the shaping and drying instructions. To maintain the quality, ensure your ingredients are fresh and avoid moisture in the storage container. Once shaped, the stones can dry overnight (12 hours) to reach the perfect firmness. Just imagine crafting delightful aroma stones without the last-minute rush!
DIY Aroma Stones Recipe FAQs
How do I select the best flour for making DIY aroma stones?
Absolutely! For the best results, use white all-purpose flour as it provides a sturdy base for your stones. If gluten is a concern, you can substitute it with gluten-free flour. Just ensure that all other ingredients you use are also gluten-free to keep the recipe safe for those with sensitivities.
What’s the best way to store my finished DIY aroma stones?
To maintain their charm, store your finished aroma stones in a cool, dry area. Placing them in an airtight container is a great way to shield them from humidity and dust. This storage method will help preserve both their vibrant colors and delightful scents, making them last for years to come!
Can I freeze DIY aroma stones?
Certainly! If you want to keep your aroma stones fresh for an extended period, you can freeze them. Just place them in an airtight container or freezer bag, making sure they are not piled on top of one another to avoid sticking. They can be stored in the freezer for up to 3 months. When ready to use, allow them to thaw at room temperature before displaying or enjoying their delightful scents.
What should I do if my DIY aroma stones are too sticky?
If you find your dough is too sticky while mixing, don’t worry! Simply sprinkle in a little more flour, a tablespoon at a time, until the consistency is just right. Kneading the dough well also helps achieve that smooth texture, so give it a good workout for the best outcome.
Are DIY aroma stones safe for pets?
It’s always best to err on the side of caution. Essential oils can be harmful to pets, especially cats and certain dog breeds, so if you have furry friends at home, consider making stones without essential oils or using pet-safe alternatives to ensure everyone stays healthy and happy.
How can I customize the colors of my DIY aroma stones effectively?
For vibrant and fun colors, I often recommend using mica powder or gel food coloring. When mixing, add a small amount at first and gradually increase until you achieve your desired hue. Don’t forget to mix thoroughly to ensure even color distribution throughout your stones! Enjoy creating different shades for a truly personalized touch.
Vibrant DIY Aroma Stones: Easy Scented Crafts for Home Decor
Ingredients
Equipment
Method
- In a large bowl, begin by combining the white all-purpose flour, salt, and cornstarch.
- Gradually pour in the cooled boiled water while stirring until a soft, pliable dough forms.
- Add your chosen essential oils and mica powder or food coloring, mixing thoroughly.
- Roll the dough into individual stone shapes, ensuring uniform thickness of about 1/2 inch.
- Place your shaped stones on a drying rack or lined baking sheet and allow them to dry for 12 hours.
- Store your dried stones in a cool, dry place to maintain their colors and aromas.