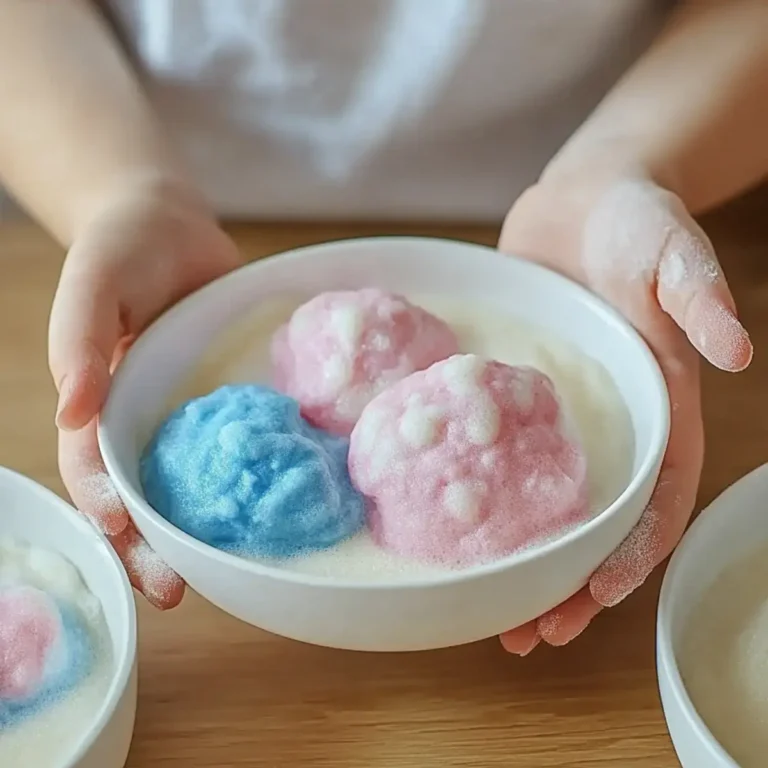
DIY Aroma Stones: A Refreshing Craft to Soothe Your Space
There’s a certain joy in transforming everyday ingredients into something delightful, and that’s exactly what inspired me to create these DIY Aroma Stones. Picture this: a quiet afternoon, the sun streaming through the window, and the gentle fragrance of essential oils filling the air as I experiment in the kitchen. Using just a few natural ingredients, I stumbled upon this simple yet effective craft that not only beautifies any space but also provides a therapeutic ambiance.
Perfect for anyone tired of synthetic scents or looking to add a personal touch to their home, these baking soda stones are a wonderful way to embrace aromatherapy. With customizable scents that can be tailored to your mood, they allow for a bit of creative magic in your day-to-day routine. Whether you’re a seasoned DIY enthusiast or just beginning, these stones will bring tranquility to your space and a smile to your face. Let’s dive into the delightful world of homemade aroma stones!
Why try DIY Aroma Stones at home?
Joyful Creativity: Crafting your own DIY Aroma Stones allows you to personalize your space with unique scents tailored to your mood.
Eco-Friendly: Made from simple, natural ingredients, these stones are a wonderful alternative to commercial air fresheners.
Therapeutic Ambiance: Experience the calming effects of essential oils, transforming any room into a serene sanctuary.
Easy and Fun: This craft is accessible for all skill levels, making it a perfect family activity or solo project.
Customizable Designs: Feel free to experiment with colors and shapes, turning your aroma stones into beautiful decor pieces.
Enhance your home’s atmosphere effortlessly and discover more crafting possibilities with our homemade DIY projects!
DIY Aroma Stones Ingredients
• Create enchanting scents with ease!
For the Base
- Baking Soda – A key ingredient that gives your DIY aroma stones their structure. No substitutes generally required.
- Cornstarch – Binds the mixture together for a sturdy texture. Can be replaced with flour for a similar effect.
- Water – Activates the baking soda and cornstarch for molding. Adjust as needed to achieve the right consistency.
For the Fragrance
- Essential Oils – Customizable scents that elevate the ambiance. Choose varieties like Lavender, Eucalyptus, or Lemon for soothing aromatherapy benefits.
For Aesthetic Appeal
- Food Coloring – Optional for adding color to your stones. Feel free to omit for a more natural look or use natural dyes.
- Mica Powder/Glitter (optional) – Enhances visual appeal with a touch of shimmer. Adds glam but isn’t necessary for function.
How to Make DIY Aroma Stones
Combine Ingredients: In a mixing bowl, blend 2 cups of baking soda and 1 cup of cornstarch. This forms the sturdy base of your DIY aroma stones, ensuring they hold their shape beautifully.
Stir in Water: Slowly add 1.25 cups of water to the dry mix. Keep stirring until the mixture is well combined. Adjust the water as necessary; aim for a moldable yet slightly damp consistency.
Add Essential Oils: Pour in 10-15 drops of your favorite essential oils. Mix well to evenly distribute the fragrance throughout the dough, ensuring every stone will release its delightful scent.
Mold the Stones: Use silicone molds or your hands to shape the mixture into desired forms. Get creative! You can create hearts, stars, or anything that speaks to you.
Let Them Dry: Place the shaped stones on wax paper or a drying rack. Allow them to dry for 24 hours, or until they are rock-hard. This drying time is crucial for proper texture!
Optional: For a touch of glamour, dust the stones with mica powder or sprinkle glitter on the edges before they dry.
Exact quantities are listed in the recipe card below.

DIY Aroma Stones Variations
Feel free to explore these delightful twists to elevate your DIY aroma stones experience!
Essential Oil Blends: Combine lavender and eucalyptus for a soothing scent, or try citrus and mint for an invigorating aroma. Mixing unique oils caters to any mood you desire!
Different Shapes: Use molds that reflect the seasons or special occasions. Heart shapes for Valentine’s Day or snowflakes for winter celebrations create a festive atmosphere.
Color Variations: Incorporate natural colorants like beet juice or turmeric for alternative hues, transforming your stones into colorful decorations that catch the eye.
Scent Strength: Adjust the number of essential oil drops according to your preference. More drops create a stronger fragrance punch, perfect for invigorating spaces or subduing strong scents.
Grainy Texture: For a rustic look, add a pinch of sea salt or Epsom salt to your mixture for added texture. This gives your stones an artisanal feel.
Scented Dusting: Give your stones a finish with a light sprinkle of mica powder or glitter before they dry, adding a touch of glam that shines in soft light.
Herbal Infusions: Incorporate dried herbs like rosemary or chamomile directly into the mixture for a unique scent and texture. These natural elements enhance both aroma and visual appeal.
Color Gradient: Layer different colors in the mold for a stunning gradient effect. This playful design adds a pop of creativity while also personalizing your stones beautifully.
What to Serve with DIY Aroma Stones?
Transform your home into a haven of tranquility with these invigorating DIY creations that not only look beautiful but will fill your space with delightful scents.
- Display Bowls: Use decorative bowls to showcase your aroma stones, allowing their colors and designs to enhance your home decor while subtly releasing fragrances.
- Hanging Sachets: Place the stones in small fabric sachets and hang them in closets or around your living space for a gentle, continuous scent that freshens the air naturally.
- Essential Oil Diffuser: Pair your aroma stones with an essential oil diffuser to layer scents, creating an immersive aromatic experience that encourages relaxation and rejuvenation.
- Calming Plants: Bring in pots of peace lilies or lavender plants to complement the soothing aroma of your stones, adding a touch of nature to your space.
- Herbal Tea: Sip on herbal teas infused with chamomile or mint while enjoying the calming presence of your aroma stones—they’re a perfect match for a serene afternoon.
- Cozy Candlelight: Light a few unscented candles around your aroma stones to create an inviting ambiance, letting the warmth accentuate the lovely scents without overpowering them.
- Bedtime Routine: Place them in your bedroom as part of a calming bedtime routine; a lovely visual reminder to unwind while embracing the aromatic benefits.
- Refreshing Air Mist: Use a DIY air spray with essential oils (like eucalyptus or lavender) to further enhance your space, creating a layered scent experience that harmonizes beautifully with your stones.
- Natural Wax Melts: Consider using wax melts infused with complementary fragrances to create an additional scent profile that can lift your atmosphere and provide a delightful sensory journey.
Storage Tips for DIY Aroma Stones
Airtight Container: Store any unused DIY aroma stones in an airtight container to preserve their delightful scent for up to 3 months.
Room Temperature: Keep the stones at room temperature, away from direct sunlight, to maintain their durability and fragrance.
Reapplying Scent: For extended scent longevity, consider adding a drop or two of your chosen essential oils weekly to the stones.
Avoid Moisture: Ensure the stones remain completely dry to prevent dampness, which could affect both texture and aroma quality.
Expert Tips for DIY Aroma Stones
- Right Consistency: Achieve a moldable mixture by gradually adding water and adjusting as needed; too much water will make stones overly soft.
- Scent Strength: For a stronger aroma, add extra essential oils to the stones. Reapply drops weekly for lasting fragrance.
- Drying Time: Ensure stones are completely dry before handling; moisture can lead to undesirable textures or scents.
- Creative Shapes: Experiment with different molds or free-hand shapes to add a personal touch to your DIY aroma stones.
- Natural Dyes: If using food coloring, explore natural dyes like turmeric or beet juice to keep your craft eco-friendly.
Make Ahead Options
These DIY Aroma Stones are perfect for busy crafters looking to save time! You can prepare the mixture up to 24 hours in advance by combining 2 cups of baking soda, 1 cup of cornstarch, and the essential oils in a bowl, then cover it tightly to prevent drying out. Once molded into shapes, allow the stones to dry for 24 hours before storing them in an airtight container to maintain their scent and quality. When you’re ready to use them, simply display your beautifully crafted stones around your space for a delightful aromatic effect. This way, you can effortlessly enjoy a fragrant ambiance without the last-minute hassle!
DIY Aroma Stones Recipe FAQs
What kind of essential oils can I use?
Absolutely! You can choose from a wide range of essential oils like Lavender for relaxation, Eucalyptus for a refreshing aroma, or Lemon for a bit of zest. Feel free to get creative by mixing different scents together, such as mint and lavender. The goal is to create a fragrance that uplifts your mood and matches your space perfectly!
How should I store the DIY aroma stones?
To keep your DIY aroma stones fresh and fragrant, store any unused stones in an airtight container at room temperature, away from direct sunlight. This will help preserve their delightful scent for up to 3 months. If you notice the aroma fading, simply add a drop or two of your favorite essential oils on the stones weekly to refresh their scent!
Can I adjust the consistency of the mixture?
Yes, very! If you find that the mixture is too dry, gradually add small amounts of water until you achieve a moldable consistency. The ideal texture should be slightly damp but hold its shape without falling apart. Conversely, if it’s too wet, add a bit more baking soda or cornstarch to thicken it up. Just remember to mix well after each adjustment!
What if my stones are too soft after drying?
If your stones feel too soft after the drying period, it’s likely they didn’t dry out completely! Make sure to place them in a well-ventilated area to continue drying. I often let mine sit for an additional 12-24 hours, turning them over occasionally to ensure they dry evenly. Keeping moisture away is key for the perfect texture!
Are there any dietary considerations for pets?
While the ingredients in your DIY aroma stones are generally safe, essential oils can be harmful to pets, especially cats and certain breeds of dogs. Make sure to keep these stones in places that are out of their reach. If you want to ensure a pet-friendly environment, consider skipping essential oils altogether or opting for natural herbs like dried lavender instead!
DIY Aroma Stones: A Refreshing Craft to Soothe Your Space
Ingredients
Equipment
Method
- In a mixing bowl, blend 2 cups of baking soda and 1 cup of cornstarch.
- Slowly add 1.25 cups of water to the dry mix and stir until well combined.
- Pour in 10-15 drops of your favorite essential oils and mix well.
- Use silicone molds or hands to shape the mixture into desired forms.
- Place the shaped stones on wax paper or a drying rack, and allow to dry for 24 hours.