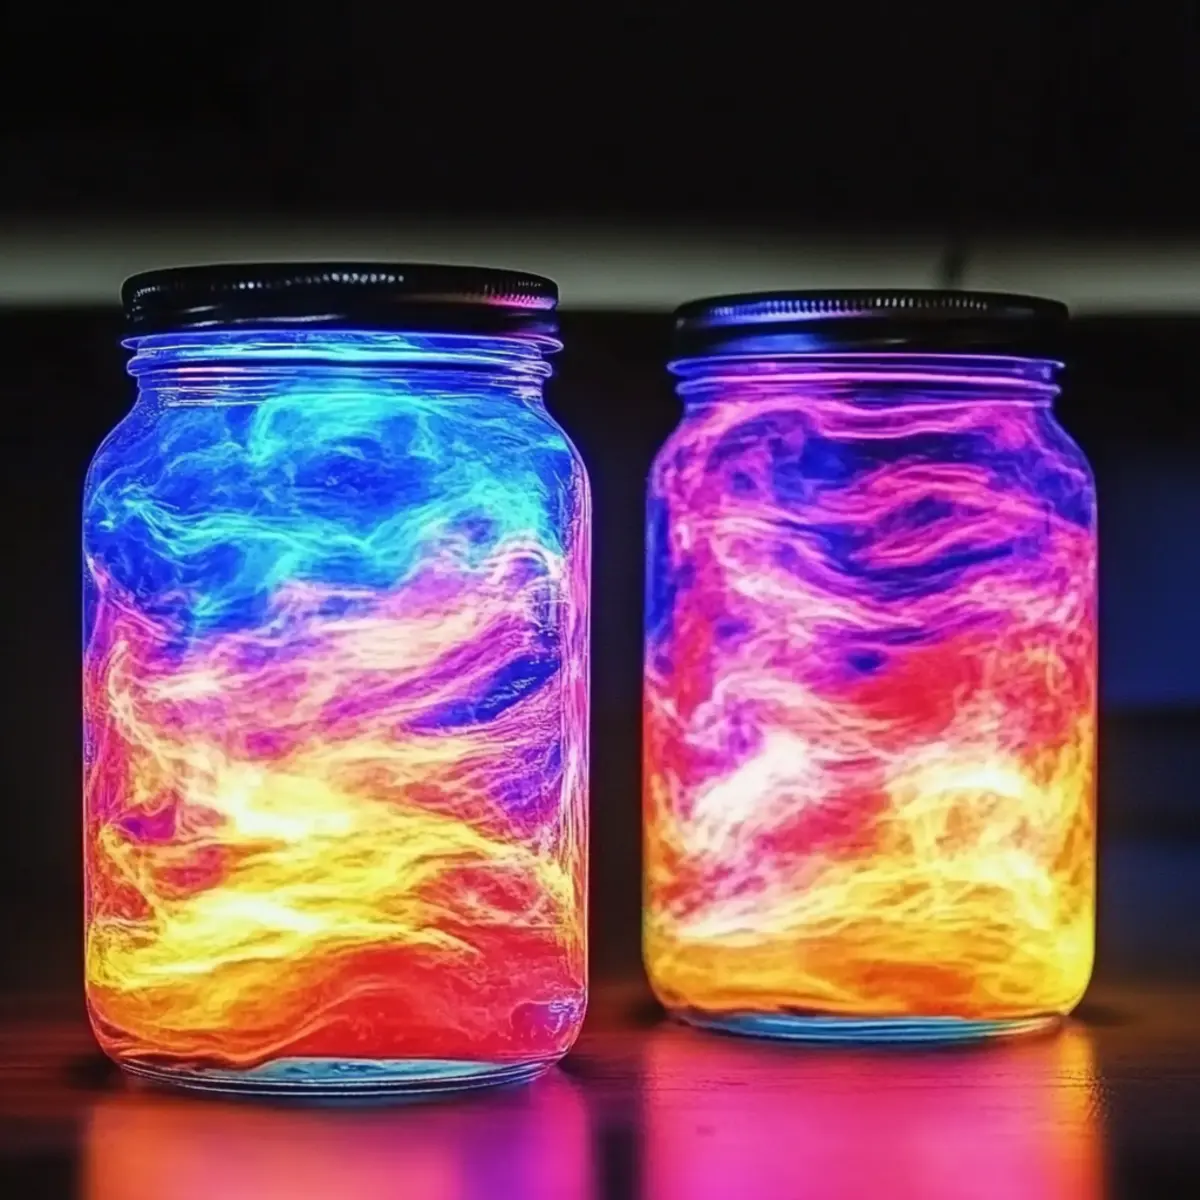
Mesmerizing DIY Color-Changing Lava Lamp Jars for Kids
When the afternoon sun streams through our kitchen window, there’s an undeniable magic in transforming ordinary ingredients into something extraordinary. I recently embarked on an unforgettable adventure with my kids, crafting DIY Color-Changing Lava Lamp Jars that not only captivate the eye but also spark curiosity about science! In just 10 minutes, we created vibrant, bubbling concoctions that were as educational as they were fun—perfect for keeping young minds engaged while having a blast at home.
Imagine the joy on their faces as they watched colorful bubbles dance up and down, learning about density and chemical reactions without even realizing it. This project is an amazing way to introduce your little ones to the wonders of science while adding a whimsical touch to your living space. Let’s dive into this delightful DIY project together—you won’t want to miss out on the colorful chaos that awaits!
Why will you love DIY Color-Changing Lava Lamps?
Fascinating Science: Your kids will be mesmerized by the bubbling effect that teaches important concepts like density and chemical reactions.
Quick and Easy: This fun project takes only 10 minutes to complete, making it perfect for busy afternoons.
Creative Expression: Personalize their jars with food coloring or glitter, allowing kids to express their artistic flair.
Engagement Guaranteed: Perfect for keeping young minds curious and captivated, making learning a delightful experience.
Family Bonding: Enjoy a hands-on science adventure together, creating memories while exploring the wonders of the DIY world.
Transform your kitchen into an unforgettable learning space with this mesmerizing project!
DIY Color-Changing Lava Lamp Ingredients
For the Lava Lamp Base
- Clear Vegetable Oil – This is the core of your lava lamp, providing the density needed for the bubbling effect.
- Water – A crucial element that sinks to the bottom and reacts with the oil to create mesmerizing movements.
For the Chemical Reaction
- Dish Soap – Thickens the mixture and bonds the ingredients together, enhancing the visual effect.
- Baking Soda – Key for initiating that fun fizzing reaction when paired with citric acid.
- Citric Acid – Introduces the bubbly magic, making the lava lamp come alive!
For Assembly
- Small Jar or Clear Plastic Bottle – A clear container is essential to showcase the stunning colors and bubbling action.
- Spoon or Craft Stick – For meticulously mixing your ingredients together.
- Small Funnel (optional) – Helps in pouring ingredients smoothly into the jar, reducing spills and mess.
For the Fun Touch
- Glitter (optional) – Sprinkle in some sparkle to elevate the visual appeal and make your lava lamp even more enchanting.
- Food Coloring (optional) – Add a few drops for vibrant color that transforms the science experience into an artful masterpiece.
Create your very own DIY Color-Changing Lava Lamp, a educational project that not only excites but teaches!
How to Make DIY Color-Changing Lava Lamp Jars
Pour ½ cup of clear vegetable oil into your small jar or clear plastic bottle. This oil forms the base for your lava lamp, providing the necessary density for the bubbling effect.
Add ¼ cup of water gently to the jar. Watch as the water sinks to the bottom, clearly contrasting with the oil above. This step sets the stage for the mesmerizing magic to come!
Mix in 1 tablespoon of dish soap until well combined. This will thicken the mixture and help the ingredients blend, enhancing the vibrant lava lamp visuals you’ll create.
Sprinkle ¼ teaspoon of baking soda into the jar, followed by ¼ teaspoon of citric acid. This combination initiates the exciting fizzing reaction that makes the bubbling effect come alive!
Optional: Add glitter for an extra touch of sparkle and visual appeal. Your kids will love watching the glitter twinkle amidst the colorful bubbles!
Stir the mixture well using a spoon or craft stick to ensure everything is fully blended. This is crucial for achieving those delightful layers of movement in your lava lamp jar.
Seal the jar tightly. Now enjoy the astonishing lava lamp effect as the bubbling and swirling colors dance together!
Optional: Consider personalizing the jars with food coloring for a vibrant touch!
Exact quantities are listed in the recipe card below.
What to Serve with DIY Color-Changing Lava Lamps?
Get ready to captivate and educate your kids with lively experiments that draw them into the wonders of science!
- Colorful Snacks: Serve slices of vibrant fruits like watermelon, strawberries, or blueberries that echo the colorful spirit of your lava lamps.
- Themed Drinks: Prepare fun, colorful mocktails—try mixing fruit juices with fizzy soda for a refreshing beverage against the bubbling backdrop.
- Crafting Station: Set up a nearby crafting table with extra supplies like stickers, markers, and glitter, allowing kids to personalize their lava jars while they wait.
- Educational Games: Pair this hands-on activity with science-themed board games or trivia to double the fun and learning during your science day.
- Scented Candles: Light some fruity or nature-inspired scented candles to create a cozy atmosphere while your little ones explore the magic of science.
- Mini Science Fair: Organize a mini science showcase at home where each kid can present their lava lamps along with other small science experiments they’ve completed.
By intertwining education with delightful experiences, you can create unforgettable moments filled with laughs, creativity, and discovery!
Make Ahead Options
These DIY Color-Changing Lava Lamp Jars for Kids are perfect for preparing ahead of time to streamline your science activities! You can assemble the base (oil and water) up to 24 hours in advance, but for optimal results, it’s best to mix in the dish soap, baking soda, and citric acid right before the experiment for the freshest fizz! Simply store the jar tightly sealed at room temperature until you’re ready to finish the project. Just before serving, stir in the dish soap and the fizzing agents to witness the vibrant, bubbling magic come alive. This way, you’ll save time while ensuring your kids have a captivating experience!
Expert Tips for DIY Color-Changing Lava Lamps
- Clear Container: Use a transparent jar or plastic bottle to maximize visibility; it’s essential for showcasing the vibrant effects of your lava lamp.
- Layering Matters: Pour ingredients gently and in the right order to create distinct layers—this enhances the bubbling motion you’ll see later.
- Kitchen Supervision: If children are helping, supervise closely during mixing to ensure safety, especially with baking soda and citric acid.
- Add Color: Introduce food coloring to your water before adding it to the oil for an extra dash of excitement and to customize your DIY lava lamp jars.
- Timing Tip: Assemble your lava lamp just before showing it off—the fizzing reaction is most vibrant and captivating when fresh ingredients are used.
Storage Tips for DIY Color-Changing Lava Lamp Jars
Best Use: For maximum visual impact, assemble the DIY Color-Changing Lava Lamp Jars just before showing them to your kids, as reactions may diminish over time.
Room Temperature: Keep the jars at room temperature and away from direct sunlight to maintain the thrill of the bubbling effect.
Fridge: Avoid refrigerating the lava lamp jars; cold temperatures can disrupt the reaction and reduce effectiveness.
Reheating: If the fizzing has slowed down, you can freshen it up slightly with a small splash of new water and a sprinkle of baking soda—but it’s best enjoyed fresh!
DIY Color-Changing Lava Lamp Variations
Invite your little scientists to get creative with these fun twists on your vibrant lava lamp project!
- Glittery Surprise: Add various colors of glitter to create a sparkling, enchanting effect that mesmerizes as it dances around.
- Bold Colors: Use different food coloring combos for unique hues; try layering colors for a whimsical rainbow effect!
- Scented Fun: Incorporate a few drops of essential oils or scented liquid soap for a delightful aromatic twist while they watch the bubbles.
- Shimmering Oils: Experiment with flavored oils or colored oils for added visual appeal and unexpected colors in your lava lamp jars.
- Natural Ingredients: Substitute citric acid with vinegar for a similar fizzing effect; it lends a unique twist to the chemical reaction!
- Tactile Textures: Add small beads or confetti to give a textured feel; watching them swirl adds another sensory layer to the magic!
- Light It Up: Place the jar on top of a small LED light or under a lamp to enhance the colors and make your lava lamp glow even brighter!
- Themed Designs: For special occasions, create themed lava lamps by matching colors to holidays—red and green for Christmas or pastels for Easter!
Let your imagination shine while crafting your own enchanting lava lamp masterpieces!

DIY Color-Changing Lava Lamp Jars Recipe FAQs
What type of vegetable oil should I use for the lava lamp?
Absolutely! I recommend using a clear vegetable oil, such as canola or corn oil, as it provides the perfect density for the bubbling effect. Make sure it’s clear, as colored oils will change the visual outcome of your lava lamp.
How long can I store the finished lava lamp jars?
For best results, it’s best to assemble the DIY Color-Changing Lava Lamp Jars just before use. The chemical reactions may diminish over time, so it’s ideal to showcase them fresh for maximum fizz and visual appeal.
Can I reuse the ingredients for another lava lamp later?
Very! You can reuse the bottle or jar for future experiments, but the initial mixture should be discarded after use, as once the reaction slows down, you won’t get that same mesmerizing effect again.
Can I freeze my lava lamp jars?
While it might be tempting, I don’t recommend freezing your lava lamp jars. Doing so can disrupt the ingredients and kill the fizzing reaction. Always keep them at room temperature and use them fresh for the best results!
Are the ingredients safe for kids?
Absolutely! All the ingredients used in this DIY Color-Changing Lava Lamp Jars activity are non-toxic and safe for kids. However, it’s important to supervise young children during the project, especially when handling baking soda and citric acid, to keep everything fun and safe.
What do I do if my lava lamp isn’t bubbling properly?
No worries, this can happen! If your lava lamp isn’t bubbling as expected, ensure the ingredients are mixed correctly. If you’ve already sealed the jar, try gently shaking it to redistribute the contents. Additionally, you can try adding a little more baking soda to kickstart the fizzing reaction again.
Mesmerizing DIY Color-Changing Lava Lamp Jars for Kids
Ingredients
Equipment
Method
- Pour ½ cup of clear vegetable oil into your small jar or clear plastic bottle.
- Add ¼ cup of water gently to the jar.
- Mix in 1 tablespoon of dish soap until well combined.
- Sprinkle ¼ teaspoon of baking soda into the jar, followed by ¼ teaspoon of citric acid.
- Optional: Add glitter for an extra touch of sparkle.
- Stir the mixture well using a spoon or craft stick.
- Seal the jar tightly and enjoy the astonishing lava lamp effect!