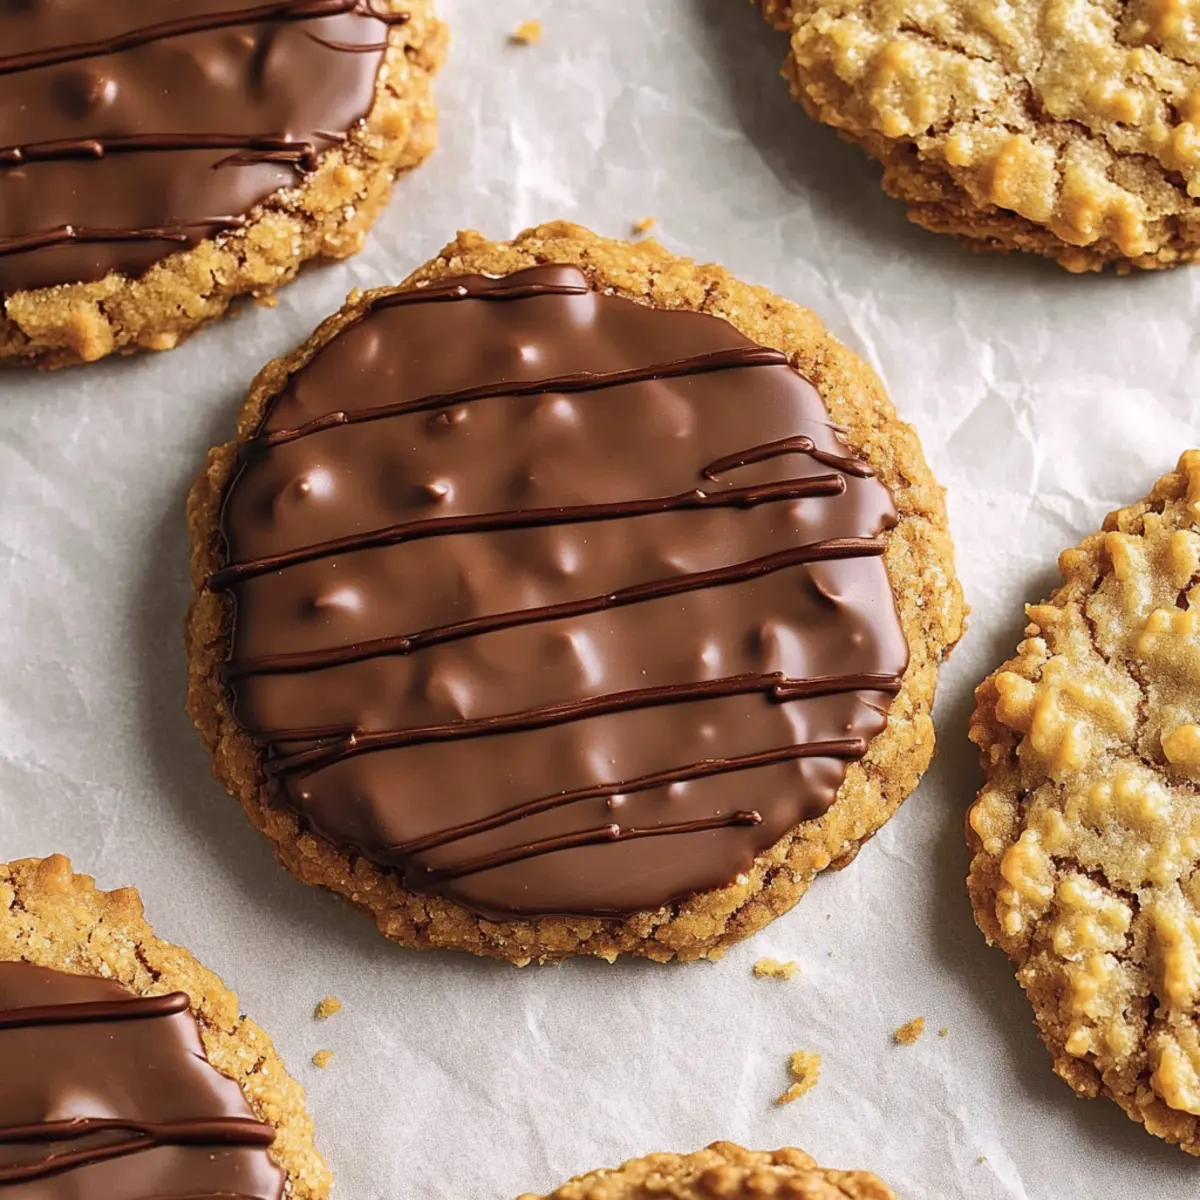
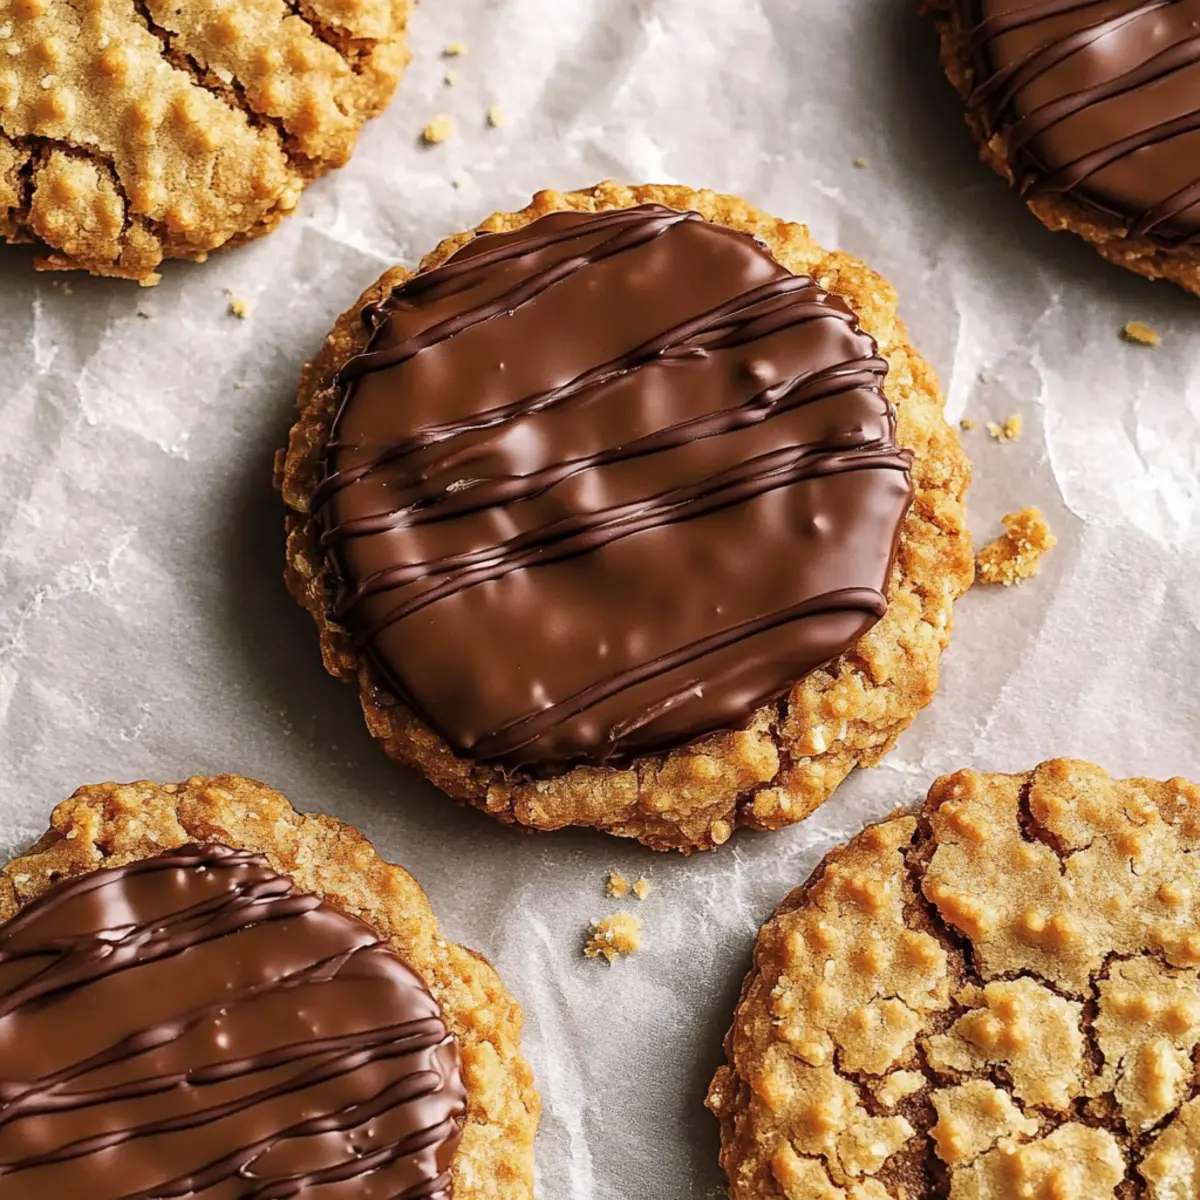
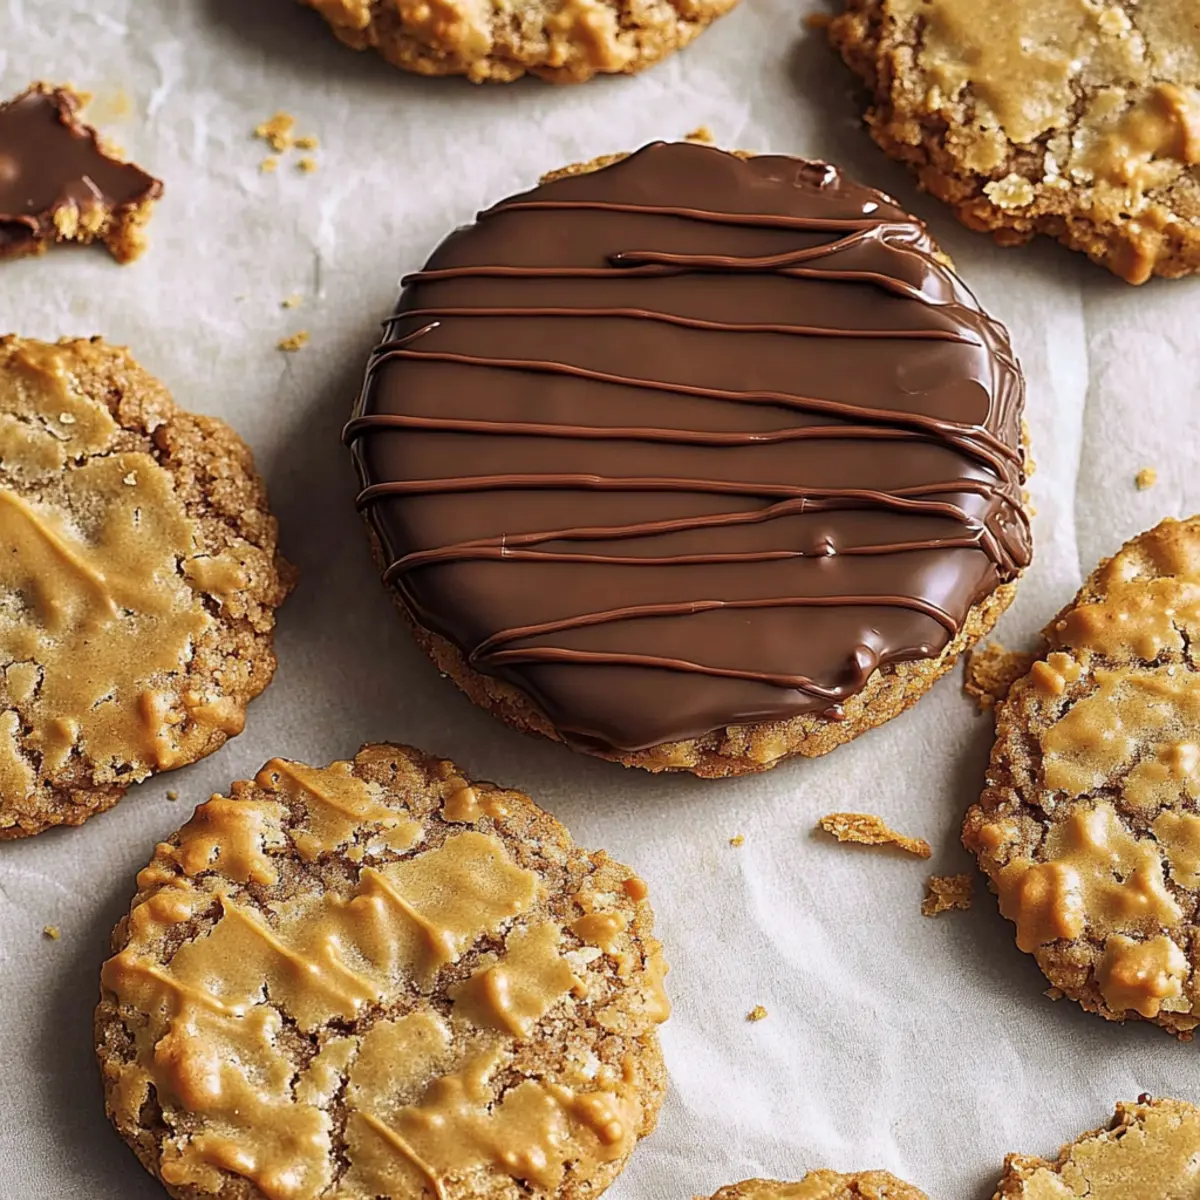
Irresistibly Crunchy Homemade Chocolate Hobnobs Recipe
As the afternoon sun streams through my kitchen window, I find myself drawn to the comforting ritual of baking. The moment I combine the hearty crunch of oats with a splash of golden syrup, I can almost hear the gentle whisper of nostalgia as I recreate a beloved British classic: Homemade Chocolate Hobnobs. There’s something truly magical about these crunchy oat biscuits that transforms tea time into a delightful experience.
Simple yet satisfying, this recipe is perfect for those of us yearning to escape the humdrum of fast food. Whether enjoyed straight from the oven or luxuriously dipped in chocolate, these biscuits cater to your cravings any time of day. It’s a quick and easy process that will leave your kitchen filled with warmth and the irresistible aroma of freshly baked goodness. Join me as we embark on a journey to create these delectable treats that are sure to impress family and friends alike!

Why You’ll Love This Homemade Chocolate Hobnobs Recipe
Crunchy Delight: Each bite of these Homemade Chocolate Hobnobs delivers a perfect crunch, thanks to the heartiness of oats. Quick Prep: With simple steps, you can whip up a batch in no time, making them ideal for unexpected guests or a cozy tea break. Customizable Options: Whether you prefer them plain or indulgently dipped in chocolate, you can easily tailor them to your taste. Nostalgic Charm: These biscuits evoke a sense of nostalgia, reminiscent of classic British tea times. Family Favorite: Perfect for sharing, they’re sure to be a hit with both kids and adults, transforming snack time into something special. Let’s get baking and bring a touch of warmth to your day with these delightful treats!
Homemade Chocolate Hobnobs Ingredients
Get ready to create your own tasty batch of these classic British biscuits!
For the Biscuit Base
Old-Fashioned Rolled Oats – Provide the essential crunchy texture; quick oats can be a substitute, but the result might differ.
Unsalted Butter – Adds rich flavor and moisture; you can use margarine for a dairy-free alternative.
Golden Syrup – Sweetens and gives a unique caramel flavor; try light corn syrup or honey if needed, but it may change the taste a bit.
Golden Caster Sugar – Contributes to the sweetness and tender texture; regular granulated sugar also works.
Pure Vanilla Extract – Elevates the overall flavor; imitation vanilla can be used in a pinch, though it’s less refined.
All-Purpose Flour – Essential for structure; swap in whole wheat flour for density or a gluten-free blend for gluten-free options.
Baking Powder – Ensures the biscuits puff up nicely; always check it’s fresh for the best results.
Baking Soda – Works with acid to create lift; essential for balancing out sugar acidity.
Salt – Enhances all flavors; reduce if using salted butter.
Ground Cinnamon (optional) – Adds a warm touch; adjust to suit your taste or leave it out entirely.
For the Chocolate Coating (optional)
Milk Chocolate or Dark Chocolate – Provides a sweet finish; white chocolate can be a delightful alternative for a different twist.
How to Make Homemade Chocolate Hobnobs
Preheat Oven: Start by setting your oven to 350°F (175°C). This temperature will help achieve that perfect golden texture. Don’t forget to line two baking sheets with parchment paper!
Pulse Oats: Grab your food processor and pulse the old-fashioned rolled oats three times for about one second each. They should be coarsely ground, enhancing the delightful crunch factor of your biscuits.
Cream Ingredients: In a mixing bowl, beat together the unsalted butter, golden syrup, and sugars until the mixture is smooth and creamy. This should take a couple of minutes—it’s the base for the rich flavor!
Mix Dry Ingredients: In a separate bowl, combine the pulsed oats, all-purpose flour, baking powder, baking soda, salt, and optional cinnamon. Whisk together until evenly mixed to ensure an even rise and flavor distribution.
Combine Mixtures: Slowly stir the dry ingredients into the wet mixture until fully incorporated. Don’t worry if the dough feels a bit dense; that’s just how it should be!
Shape Cookies: Use a cookie scoop or your hands to portion out the dough, forming balls and flattening them slightly on the prepared baking sheets. Leave some space between each cookie for even baking.
Bake: Place the baking sheets in the preheated oven and bake for about 15 minutes. You’ll know they’re done when the edges are lightly golden brown. Let them cool on the sheets for 20 minutes for the perfect texture.
Optional Chocolate Coating: If you’re feeling indulgent, melt your choice of chocolate in a microwave or double boiler. Dip the cooled cookies in the melted chocolate, then set them on parchment paper to let the chocolate harden.
Optional: Serve these delightful biscuits with a cup of tea or coffee for a truly cozy experience.
Exact quantities are listed in the recipe card below.
Expert Tips for Homemade Chocolate Hobnobs
Oat Texture: Don’t over-process the oats; they should remain slightly chunky for the ideal crunch in your Homemade Chocolate Hobnobs.
Cooling Time: Allow the biscuits to cool completely before dipping in chocolate. This prevents the chocolate from melting and ensures a beautiful finish.
Storage Solutions: Keep your cookies in an airtight container to maintain freshness for up to three days. For longer storage, freeze them for up to three months.
Dough Consistency: If your dough seems too dry, add a touch of milk; this will help achieve the right balance of moisture without compromising texture.
Flavor Variations: Feel free to add nuts or dried fruits to your dough for an unexpected burst of flavor and an exciting texture in your Homemade Chocolate Hobnobs!
Storage Tips for Homemade Chocolate Hobnobs
Room Temperature: Keep your Homemade Chocolate Hobnobs in an airtight container at room temperature for up to 3 days to maintain their delightful crunch.
Fridge: For slightly longer freshness, store them in the refrigerator; they can last for up to 1 week, but may become a bit softer.
Freezer: To preserve these tasty biscuits for up to 3 months, freeze them in a single layer on a baking sheet, then transfer to an airtight container or freezer bag.
Reheating: If you prefer warm biscuits, pop them in the oven at 350°F (175°C) for about 5 minutes to bring back their crunch before serving.
What to Serve with Homemade Chocolate Hobnobs?
Pair your delightful biscuits with an array of complementary flavors and textures for a cozy afternoon treat.
Aromatic English Breakfast Tea: The robust flavors of this classic brew beautifully balance the sweetness of the Hobnobs, elevating your tea time to an indulgent experience.
Rich Irish Coffee: With its warming notes, this coffee drink pairs perfectly, bringing a delightful contrast to the crunchy texture of the biscuits.
Fresh Strawberries: The juicy sweetness of strawberries adds a refreshing element that complements the buttery oat flavor, making each bite even more delightful.
Creamy Vanilla Ice Cream: Serve these biscuits alongside a scoop of ice cream for a decadent dessert twist. The cold creaminess contrasts wonderfully with the crunchy cookies.
Chocolate Dipping Sauce: For those who crave extra indulgence, a warm chocolate dipping sauce makes for a luxurious addition, enhancing the overall chocolate experience.
Homemade Milkshake: Pairing these biscuits with a rich milkshake can turn your dessert into a nostalgic treat, reminiscent of childhood delights.
Imagine gathering your loved ones, sharing stories and laughter over these delicious pairings; nothing quite transforms a simple snack into a cherished memory like the crunch of Homemade Chocolate Hobnobs accompanied by your favorites!
Make Ahead Options
These Homemade Chocolate Hobnobs are perfect for meal prep enthusiasts! You can prepare the dough up to 24 hours in advance and refrigerate it, allowing the flavors to meld beautifully. Simply shape the cookies and place them on a baking sheet before covering tightly with plastic wrap or storing in an airtight container. When you’re ready to bake, just preheat your oven and bake the dough straight from the fridge for about 15 minutes. For the optional chocolate coating, melt it while the cookies cool, ensuring a crisp finish. This way, you’ll have fresh, crunchy oat biscuits ready to delight your family with minimal effort!
Homemade Chocolate Hobnobs Variations
Feel free to enhance your Homemade Chocolate Hobnobs with these delightful twists that will cater to all kinds of taste buds!
Nutty Delight: Add chopped walnuts or pecans to the dough for a delicious crunch and a nutty flavor boost.
Fruity Twist: Incorporate dried cranberries or raisins into the mixture for a sweet, chewy surprise in each biscuit.
Cinnamon Infusion: Increase ground cinnamon for a stronger flavor; a sprinkle of nutmeg can also add warmth and depth.
Gluten-Free Option: Substitute all-purpose flour with a gluten-free flour blend to make these biscuits suitable for gluten-sensitive friends.
Choco-Lover’s Upgrade: Use dark chocolate instead of milk chocolate for a richer, more intense chocolate experience.
Dairy-Free Substitution: Swap out butter for coconut oil or a plant-based butter to create a vegan version of these beloved biscuits.
Spicy Kick: For a hint of heat, add a pinch of cayenne pepper or ground ginger into the dry ingredients for a unique twist.
Zesty Flavor: Mix in some orange or lemon zest into the batter to brighten the flavor profile and add a refreshing zing.
Homemade Chocolate Hobnobs Recipe FAQs
How do I choose the right oats for my Homemade Chocolate Hobnobs?
For the best results, opt for old-fashioned rolled oats; they provide that perfect crunch and texture. If you decide to use quick oats, keep in mind that they may change the texture slightly, resulting in a softer cookie.
What is the best way to store Homemade Chocolate Hobnobs?
To maintain their delightful crunch, store your Homemade Chocolate Hobnobs in an airtight container at room temperature for up to 3 days. If you want them to last longer, refrigerate them for up to 1 week, although they may become a bit softer.
Can I freeze my Homemade Chocolate Hobnobs?
Absolutely! To freeze your delicious biscuits, place them in a single layer on a baking sheet and freeze until solid. Then transfer the cookies to an airtight container or freezer bag, where they can be stored for up to 3 months. When you’re ready to enjoy them, simply thaw at room temperature or warm them in the oven at 350°F (175°C) for about 5 minutes.
What should I do if my dough seems too dry?
If your dough feels too dry, don’t fret! Simply add a splash of milk, a tablespoon at a time, until the consistency is right. This should help balance the moisture and ensure that your Homemade Chocolate Hobnobs turn out perfectly scrumptious.
Are there any dietary considerations for my Homemade Chocolate Hobnobs?
Yes! If you’re concerned about dietary restrictions, there are a few alternatives. You can use margarine for a dairy-free version, substitute the golden syrup with light corn syrup or honey, and for gluten-free options, replace all-purpose flour with a certified gluten-free blend. Just remember to check labels for potential allergens!
Can I add flavors or mix-ins to my Homemade Chocolate Hobnobs?
Very! Feel free to experiment by adding in chopped nuts, dried fruits, or even spices like nutmeg to suit your taste. These small additions can elevate your biscuits and make them even more special!
Irresistibly Crunchy Homemade Chocolate Hobnobs Recipe
Ingredients
Equipment
Method
- Preheat the oven to 350°F (175°C) and line two baking sheets with parchment paper.
- Pulse the old-fashioned rolled oats in a food processor three times for about one second each until coarsely ground.
- In a mixing bowl, beat together the unsalted butter, golden syrup, and sugars until smooth and creamy.
- In a separate bowl, combine the pulsed oats, all-purpose flour, baking powder, baking soda, salt, and optional cinnamon; whisk together.
- Slowly stir the dry ingredients into the wet mixture until fully incorporated.
- Use a cookie scoop or your hands to form balls, flattening them slightly on the baking sheets.
- Bake for about 15 minutes or until edges are lightly golden brown; let cool for 20 minutes.
- Melt chocolate and dip cooled cookies; set on parchment paper to harden.